Issue
Cause and solution
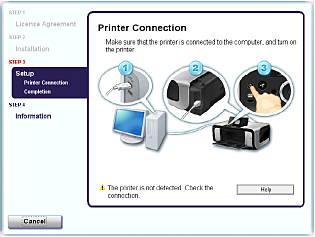
Unable to proceed beyond the Printer Connection screen ( Windows )
If you were unable to proceed beyond the Printer Connection screen, follow the procedure below to reinstall the MP Drivers.
(1) Click Cancel on the Printer Connection screen.
(2) Click Start Over on the Installation Failure screen.
(3) Click Back on the screen that appears next.
(4) Click Exit on the PIXMA XXX screen (where "XXX" is your machine's name), then remove the CD-ROM.
(5) Turn the machine off.
(6) Restart the computer.
(7) Make sure you have no application software running, including anti-virus software.
(8) Follow the procedure described in your setup sheet to reinstall the MP Drivers.
Cause and solution
Installation does not start automatically when the Setup CD-ROM is inserted into your computer's disc drive
(1) Click Start then Computer.
In Windows XP, click Start then My Computer.
In Windows 2000, double-click the My Computer icon on the desktop.
(2) Double-click the CD-ROM icon 
Caution
To use the Run command to start the setup program, specify your disc drive and then the name of the setup program, MSETUP4.EXE. The drive letter of the disc drive depends on your computer.
Cause and solution
Double-click the CD-ROM icon on your desktop to start installation.
If the CD-ROM icon is not displayed, restart your computer.
If the icon is still not displayed, try different discs and see if they are displayed.
If other discs are displayed, there is a problem with the Setup CD-ROM. Contact a Canon service representative.
Cause and solution
Installation procedure not followed correctly
Follow the procedure described in your setup sheet for proper installation.
If the MP Drivers were not installed correctly, uninstall the MP Drivers, restart your computer, and then reinstall the MP Drivers. Refer to the PC Printing Guide on-screen manual.
Caution
If the installer was forced to be terminated due to a Windows error, the system may be in an unstable condition and you may not be able to install the MP Drivers. Restart your computer before reinstalling.
Windows
Caution
1. Be sure to TURN THE MACHINE OFF before continuing.
(1) Press the ON/OFF button.
(2) Make sure that the Power lamp stops flashing.
2. Turn the computer on and start Windows.
Caution
If the Found New Hardware or Found New Hardware Wizard screen appears automatically, remove the USB cable connected to your computer. Click Cancel to quit the screen. In Windows Vista, the screen may close automatically when the USB cable is unplugged. Then turn off the machine and proceed from step 3. to install the software.
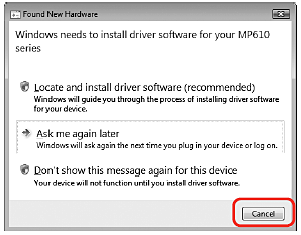
3. Insert the Setup CD-ROM. The setup program should run automatically.
In Windows Vista, go to Step 4.
In Windows XP and Windows 2000, go to Step 6.
4. If the AutoPlay screen appears, click Run Msetup4.exe.
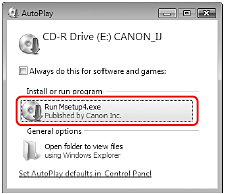
5. If the User Account Control screen appears, click Continue. If the same screen reappears in subsequent steps, click Continue.

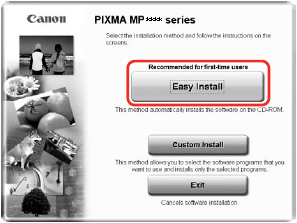
6. When the main menu appears, click Easy Install.
The MP Drivers, On-screen Manuals, and application software are installed automatically.
Caution
If you want to select particular items to install, click Custom Install and follow the onscreen instructions to proceed with the installation.
7. When the list of applications to install appears, confirm the contents and click Install.
Caution
Move the cursor over items to display explanations of each application.
8. Read the License Agreement carefully and click Yes. The software installation screen may appear during the installation process. Follow the on-screen instructions to install the software.
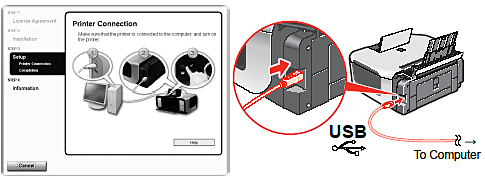
9. When the Printer Connection screen appears, connect one end of the USB cable to the computer, the other to the machine, then TURN THE MACHINE ON. The software will begin identifying the printer port being used.
Caution
If you cannot go to the next procedure after three minutes, refer to "Troubleshooting" instructions in the Quick Start Guide.
Caution
Display varies according to the printer model.
10. When the Print Head Alignment Recommended screan appears,click Next.
11. When the Setup Complete screen appears, click Next.
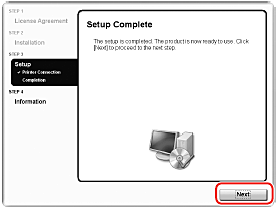
12. When the User Registration screen appears, click Next.
Caution
To register later, click Cancel and go to Step 13. After software installation is complete, double-click 
Follow the on-screen instructions to register your product. You will need your product serial number, which is located on the inside of the machine.
13. When the PIXMA Extended Survey Program screen appears, confirm the message. We would appreciate it if you would take part in this program regarding the use of Canon printers. If you can agree, click Agree.
14. When the Installation completed successfully screen appears, click Exit.
After clicking Exit, remove the CD-ROM.
If Restart is displayed, make sure that the Restart the system now (recommended) check box is selected, then click Restart.
Caution
If straight lines are misaligned or print quality is not satisfactory after installing the MP Drivers,you may need to align the Print Head.Refer to "Aligning the Print Head" in the Quick Start Guide.
Software installation is now complete.
Macintosh
Caution
1. Connect one end of the USB cable to the computer, the other to the machine.
Caution
Make sure the machine is turned on.
2. Turn on your Mac and insert the Setup CD-ROM.
Caution
If the CD-ROM folder does not open automatically, double-click the CD-ROM icon on the desktop.
3. Double-click the Setup icon.
4. When the Authenticate screen appears, enter your administrator name and password. Click OK. If you do not know your administrator name or password, click 
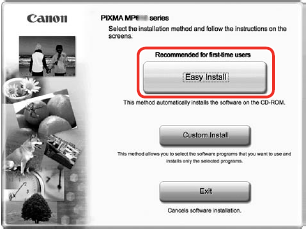
5. When the main menu appears, click Easy Install. The MP Drivers, On-screen Manuals, and application software are installed automatically.
Caution
If you want to select particular items to install, click Custom Install and follow the onscreen instructions to proceed the installation.
6. When the list of applications to install appears, confirm the contents, then click Install.
Caution
Move the cursor over items to display explanations of each application.
7. Read the License Agreement carefully and click Yes. The software installation screen may appear during the installation process. Follow the on-screen instructions to install the software.
8. When the Print Head Alignment Recommended screen appears,click Next.
9. When the Setup Complete screen appears, click Next.
10. When the User Registration screen appears, click Next.
Caution
To register later, click Cancel and go to Step 11. After software installation is complete, double-click 
Follow the on-screen instructions to register your product. You will need your product serial number, which is located on the inside of the machine.
11. When the Installation completed successfully screen appears, click Restart.
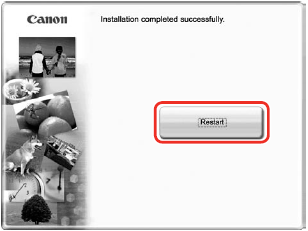
The system is restarted automatically.
When using Mac OS X v.10.2.8 to v.10.3.3:
Restarting the computer while connected to the machine may cause the machine not to be detected. To resolve this, either unplug the USB cable then plug it back in again, or turn the machine off then back on again.
Caution
Software installation is now complete.


