

Issue
Cause and solution
Ensure that the printer is turned on
If the POWER lamp is off, turn the printer on.
When the POWER lamp is flashing blue, the printer is initializing. Wait until the POWER lamp stops flashing and remains lit blue.
When the ALARM lamp is flashing orange, an error may have occurred on the printer. For details on how to resolve the error, refer to "ALARM Lamp Flashes Orange ".
Cause and solution
Ensure that the printer port setting corresponds to the printer interface connection
1. Click Start and select Control Panel, Printers and Other Hardware, and then Printers and Faxes.
For non-Windows XP, click Start, select Settings, and then Printers.
2. Select the icon of your printer.
3. Open the File menu and select Properties.
4. Click the Ports tab to confirm the port settings.
Make sure that a port named USBnnn (Canon Pro9500 series) (where "n" is a number) is selected for Print to the following port(s).
If the port setting is not correct, modify the port setting according to the interface you use on the Ports tab, or reinstall the printer driver.
Cause and solution
Ensure that the printer is securely connected to the computer
Caution
Cause and solution
Verify the printer port status
1. Click Start and right-click My Computer then select Properties.
For non-Windows XP, right-click My Computer on the desktop and select Properties.
2. On the Hardware tab, click Device Manager, double-click Universal Serial Bus controllers, and then double-click USB Printing Support.
3. On the General tab, ensure that there is no indication of a problem with the device.
Cause and solution
There may be a problem in the printer driver
Uninstall the printer driver and reinstall it. Uninstall the printer driver according to the procedure described in the Printer Driver Guide on-screen manual, and then reinstall it.
Windows
Caution
The screens below refer to Windows XP Service Pack 2 installation. Screens may differ
depending on the operating system you are using.
1. Be sure to TURN THE PRINTER OFF before continuing.
2. Turn on the computer and start Windows.
Caution
Caution
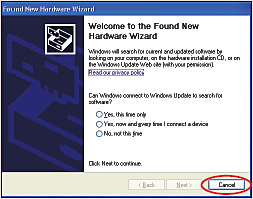
If you see the Found New Hardware Wizard, remove the USB cable. Click Cancel to quit the screen. Next, turn off the printer. Then proceed from step 3 to install the printer driver.
3. Insert the Setup CD-ROM. The setup program should run automatically.
Caution
If the installer in the CD-ROM does not run automatically, click Start and select My
Computer, then double-click the CD-ROM icon 
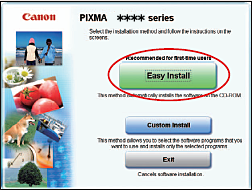
4. When the main menu appears, click Easy Install.
Caution
5. When the list of applications to install appears, verify the contents, click Install, then follow the instructions on the screen.
Move the cursor over items to display explanations of each application below.
6. Read the License Agreement and click Yes.
Follow the on-screen instructions to install the software.
If a message asking for your confirmation to restart your computer appears, click OK.
The system is restarted automatically.
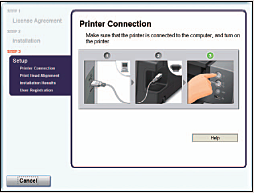
7. When the Printer Connection screen appears, ensure that the printer is connected to the computer with the USB cable, then TURN THE PRINTER ON. The software will begin
identifying the printer port being used.
Caution
If your computer cannot detect a printer port, click Help and refer to the online instructions.
If a message asking for your confirmation to restart your computer appears, click OK.
The system is restarted automatically.
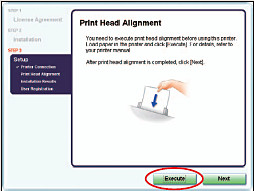
8. When the Print Head Alignment screen appears, ensure that two sheets of letter size
paper are loaded in the Auto Sheet Feeder (top paper feeder). Click Execute, read the message and click Print Head Alignment.
Caution
9. Print head alignment is automatically adjusted by printing the patterns below.

Caution
10. After print head alignment is completed, click Next.
11. When the Installation Results screen appears, click Next.
12. When the User Registration screen appears, click Register.
Caution
 on the desktop after Step 14.
 13. Go back to the User Registration screen, then click Next.
We would appreciate it if you would take part in the PIXMA Extended Survey Program regarding the use of Canon printers. For details, refer to the on-screen instructions.
14. When the Installation completed successfully screen appears, click Exit.
If Restart is displayed, ensure the Restart the system now (recommended) check box is
selected, then click Restart.
Macintosh
Caution
IMPORTANT: Since Mac® OS 9, Mac OS X Classic environments, or Mac OS X v.10.2.7 or earlier are not supported, do not connect the printer to these.
Caution
1. Turn on your Mac and your printer and insert the Setup CD-ROM.
If the CD-ROM folder does not open automatically, double-click the 
Caution
Log on as an Administrator before continuing.
2. Double-click the Setup icon.
Caution
When the Authenticate screen appears, enter your administrator name and password, then click OK.
If you do not know your administrator name or password, click 
3. When the main menu appears, click Easy Install and then Install, then follow the onscreen instructions.

Caution
4. Read the License Agreement and click Yes.
Follow the on-screen instructions to install the software.
5. When the Print Head Alignment Recommended screen appears, click Next.
6. When the User Registration screen appears, click Register.
Caution
 on the desktop after Step 11.
 7. Go back to the User Registration screen, then click Next.
8. When the Installation completed successfully screen appears, click Restart.
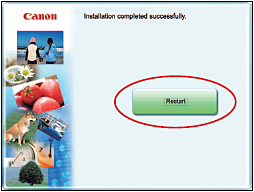
The system is restarted automatically.
9. Start the print head alignment procedure.
a. After restarting the computer, select Applications from the Go menu. Doubleclick the Utilities folder, then the Printer Setup Utility (Print Center when using Mac OS X v.10.2.8) icon.
b. When the Printer List screen appears, select Pro9500 series from the Name list, then
click Utility (Configure when using Mac OS X v.10.2.8) icon.
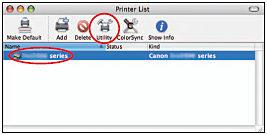
If the printer is not displayed on the Printer List, click Add to add the printer.
For details, follow the instructions in Mac Help.
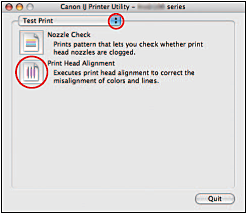
c. Select Pro9500 series from the Product list and click Maintenance.
d. Ensure that two sheets of letter size paper are loaded in the Auto Sheet Feeder (top paper feeder).
e. Click the down-arrow to select Test Print.
Click the Print Head Alignment icon, read the message and click Print Head Alignment.
Caution
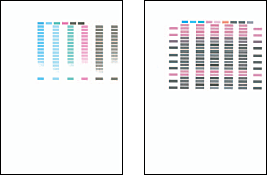
10. Print head alignment is automatically adjusted by printing the patterns below.
Caution
11. Click Quit to exit the Canon IJ Printer Utility.