Solution
When ink tanks run out of ink, replace them using the following steps.
1. Ensure that the printer is on, and then open the Front Tray.
Gently press the  mark on the Front Tray.
2. Open the Top Cover.
The Print Head Holder moves to the center.
Caution
Do not hold the Print Head Holder to stop or move it.
Do not touch the metallic parts inside the printer.
Caution
If the Top Cover is left open for more than 10 minutes, the Print Head Holder moves to the right. Close and reopen the Top Cover to return the Print Head Holder to the center.
If you open the Top Cover while the printer is preparing to feed paper from the Front Tray (when the FRONT FEED button is flashing quickly), the Print Head Holder may not move to the center.
If this happens, close the Top Cover, press the FRONT FEED button and wait until the
FRONT FEED button stops flashing and stays lit.
To continue printing from the Front Tray after replacing the ink tank, go to (3) in step 4 in "Loading Paper" and start printing again.
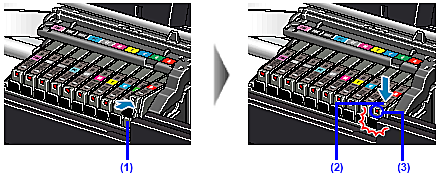
3. Remove the empty ink tank.
(1) Push the tab and remove the ink tank.
Do not touch the print head lock lever; remove only the ink tank.
Caution
Handle ink tanks carefully to avoid staining clothing or the surrounding area.
Discard empty ink tanks according to the local laws and regulations regarding disposal of consumables.
Caution
Be sure to replace ink tanks one by one when replacing more than one ink tank.
4. Prepare a replacement tank.

* Do not touch the electrical contacts on the ink tank. Doing so can cause the printer to malfunction or become unable to print.
(1) Unpack the new ink tank.
(2) Remove the orange protective cap from the bottom of the ink tank and discard it.
Caution
Do not squeeze the side of ink tanks as this may cause the ink to leak out and stain your clothes and hands.
Do not re-attach the protective cap once you have removed it.
Do not touch the open ink port once the protective cap is removed, as this may prevent the ink from being ejected properly.
Ink on the removed protective cap may stain your clothes and hands.
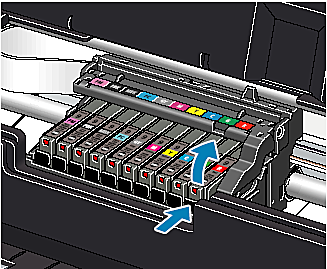
5. Install the ink tank.
(1) Insert the ink tank into the Print Head.
(2) Press on the  mark on the ink tank until the ink tank snaps firmly into place.
(3) Ensure that the ink lamp lights red.
Caution
Ensure that all the ink tanks are installed in the order directed by the label. The printer cannot be used unless all the ink tanks are installed.
6. Close the Top Cover.
The ink tank installation process is now complete.
The printer start shaking the ink tanks automatically.
Wait until the POWER lamp displays a steady blue light and the printer has stopped making operating noises. It takes about two minutes or less.
Do not open the Top Cover while the printer is operating (the POWER lamp is flashing blue).
Caution
If the ALARM lamp still flashes orange after the Top Cover is closed, see “The ALARMLamp Flashes Orange”
To maintain optimal print quality, use an ink tank within six months of first use.
Once an ink tank has been installed, do not remove it from the printer and leave it out in the open. This will cause the ink tank to dry out and the printer may not operate properly when it is reinstalled.
Color ink consumption may occur even when black-and-white or grayscale printing is specified. Color ink is consumed in the head cleaning and deep cleaning, which are necessary to maintain the printer.

