Solution
IntroductionSelecting the Audio Format of MP4 Clips
Audio Settings and Recorded Audio Channels
Recording Audio from the INPUT Terminals to CH1/CH2
Recording Audio from the Built-In Microphone or MIC Terminal to CH1/CH2
Adjusting the Audio Recording Level
Microphone Sensitivity (INPUT Terminals)
Microphone Attenuator (INPUT Terminals)
Microphone Sensitivity (Built-in Microphone)
Microphone Attenuator (Built-in Microphone)
Low-Cut Filter (Built-in Microphone)
Microphone Attenuator (MIC Terminal)
Low-Cut Filter (MIC Terminal)
Plug-in Power (MIC Terminal)
Introduction
The camcorder features 4-channel linear PCM (LPCM) or 2-channel AAC audio recording and playback for MP4 clips, and 4-channel LPCM audio recording and playback for XF-AVC clips. The sampling frequency is 48 kHz.
You can record audio using the INPUT terminals* (commercially available microphones or analog line-in audio sources), the MIC terminal (commercially available microphones) or the built-in microphone.
The audio signal will be output along with the video signal from the SDI OUT terminal (
* Requires that the handle unit be correctly attached to the camcorder.


Selecting the Audio Format of MP4 Clips
When recording MP4 clips, you can set the audio format to AAC (2 channels, 16 bit) or LPCM (linear PCM, 4 channels, 16 bit). When the resolution is set to 1280x720, the audio format is set to AAC and cannot be changed.
1. Set the power switch to CAMERA.

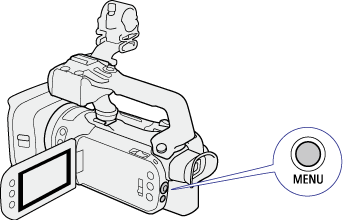
2. Press the MENU button.
3. [ 

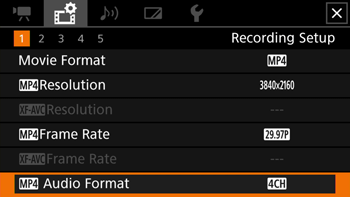
4. Select the desired option.
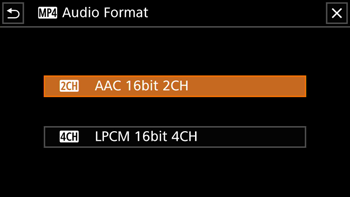
5. Select [ 
Caution
Select AAC format when versatility (the ability to play back on most devices) is more important. Select LPCM format when audio quality is the priority.
Audio Settings and Recorded Audio Channels
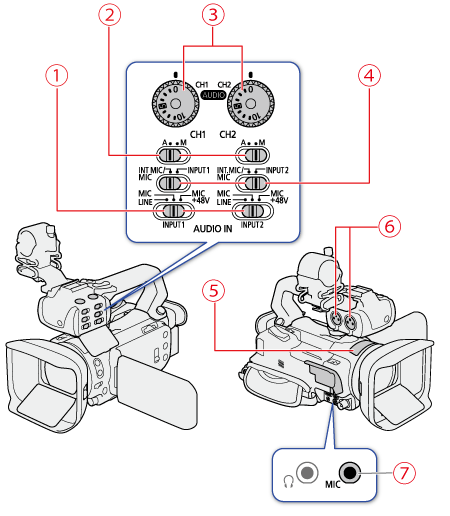
Which audio inputs are recorded to which audio channels is determined by a combination of menu settings, whether the handle unit is attached, and other audio-related controls on the camcorder. The following table gives an overview of the possible combinations.
| Microphone connected to the MIC terminal | AUDIO IN switch | Menu settings | Recorded audio channels/audio sources | |||||
[   Audio Setup] -> Audio Setup] -> | ||||||||
| for INPUT 1 | for INPUT 2 | [CH2 Input] | [CH3/CH4 Input]* | CH1 | CH2 | CH3* | CH4* | |
| – | INPUT 1 | INPUT 2 | [  INPUT 2 ] INPUT 2 ] | [  INPUT terminal ] INPUT terminal ] | INPUT 1 terminal | INPUT 2 terminal | INPUT 1 terminal | INPUT 2 terminal |
| INPUT 1 | INPUT 2 | [  INPUT 1 ] INPUT 1 ] | [  INPUT terminal ] INPUT terminal ] | INPUT 1 terminal | INPUT 1 terminal | INPUT 1 terminal | INPUT 2 terminal | |
| Yes | INPUT 1 | INPUT 2 | [  INPUT 2 ] INPUT 2 ] | [  Built-in Mic/ Built-in Mic/MIC Terminal ] | INPUT 1 terminal | INPUT 2 terminal | MIC terminal (L) | MIC terminal (R) |
| INPUT 1 | INPUT 2 | [  INPUT 1 ] INPUT 1 ] | [  Built-in Mic/ Built-in Mic/MIC Terminal ] | INPUT 1 terminal | INPUT 1 terminal | MIC terminal (L) | MIC terminal (R) | |
| INPUT 1 | INT.MIC/MIC | - | - | INPUT 1 terminal | MIC terminal (mono) | MIC terminal (L) | MIC terminal (R) | |
| INT.MIC/MIC | INPUT 2 | - | - | MIC terminal (mono) | INPUT 2 terminal | MIC terminal (L) | MIC terminal (R) | |
| No | INPUT 1 | INPUT 2 | [  INPUT 2 ] INPUT 2 ] | [  Built-in Mic/ Built-in Mic/MIC Terminal ] | INPUT 1 terminal | INPUT 2 terminal | Built-in microphone (L) | Built-in microphone (R) |
| INPUT 1 | INPUT 2 | [  INPUT 1 ] INPUT 1 ] | [  Built-in Mic/ Built-in Mic/MIC Terminal ] | INPUT 1 terminal | INPUT 1 terminal | Built-in microphone (L) | Built-in microphone (R) | |
| INPUT 1 | INT.MIC/MIC | - | - | INPUT 1 terminal | Built-in microphone (mono) | Built-in microphone (L) | Built-in microphone (R) | |
| INT.MIC/MIC | INPUT 2 | - | - | Built-in microphone (mono) | INPUT 2 terminal | Built-in microphone (L) | Built-in microphone (R) | |
| Yes | INT.MIC/MIC | INT.MIC/MIC | - | - | MIC terminal (L) | MIC terminal (R) | Built-in microphone (L) | Built-in microphone (R) |
| No | INT.MIC/MIC | INT.MIC/MIC | - | - | Built-in microphone (L) | Built-in microphone (R) | Built-in microphone (L) | Built-in microphone (R) |
| Yes | Handle unit not attached | - | - | MIC terminal (L) | MIC terminal (R) | Built-in microphone (L) | Built-in microphone (R) | |
| No | - | - | Built-in microphone (L) | Built-in microphone (R) | Built-in microphone (L) | Built-in microphone (R) | ||
* For MP4 clips, only when MENU -⋗ [ 


Recording Audio from the INPUT Terminals to CH1/CH2
1. Set the corresponding AUDIO IN switch to INPUT 1 or INPUT 2.
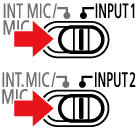
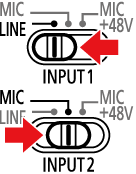
2. To select the audio source, set the corresponding INPUT switch to MIC (microphone) or LINE (audio device).
Caution
By default, when using the INPUT terminals, each audio input is recorded to a separate audio channel (INPUT 1 to CH1 and INPUT 2 to CH2). If necessary (for example, as an audio backup recording), you can record the audio input into the INPUT 1 terminal to both audio channels, CH1 and CH2. In that case, you can adjust the audio recording levels of each channel independently of each other.
1. Select [ 
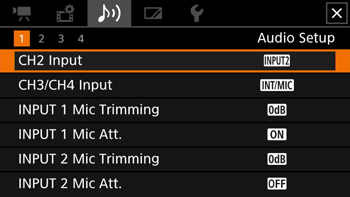
2. Select the desired option.
 INPUT 2 ]: Records audio to each channel separately. Audio input into INPUT 1 is recorded to CH1, while audio input into INPUT 2 is recorded to CH2.
 INPUT 1 ]: Audio input into INPUT 1 is recorded to both channels. Audio input into INPUT 2 will not be recorded.
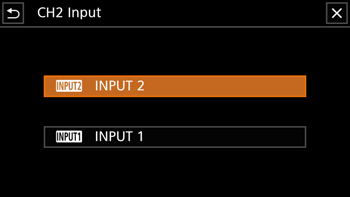
3. Select [ 
When the audio format is LPCM (4-channel audio recording) and CH1/CH2 are set to the INPUT terminals, you can select the audio input that will be recorded to channels CH3/CH4.
1. Select [ 
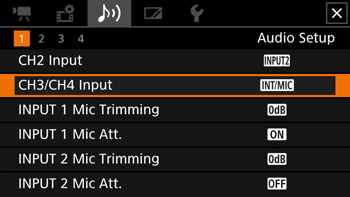
2. Select the desired option.
 Built-In Mic/MIC Terminal] is selected, the camcorder will record audio from the built-in microphone unless an external microphone is connected to the MIC terminal.
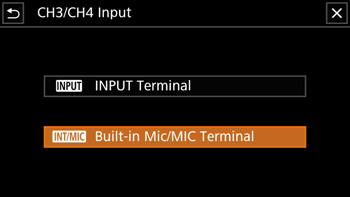
3. Select [ 
Recording Audio from the Built-In Microphone or MIC Terminal to CH1/CH2
1. If the handle unit is connected to the camcorder, set the corresponding AUDIO IN switch to INT.MIC/MIC.
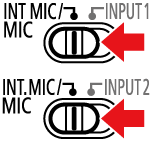
2. To use an external microphone, connect it to the MIC terminal.
Caution
Adjusting the Audio Recording Level
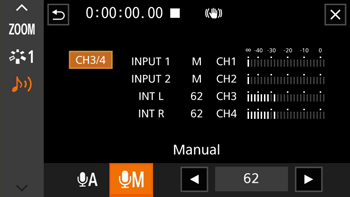
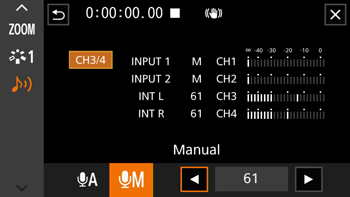
You can adjust the audio recording level of the various audio channels using the audio controls on the handle unit or the audio screen in the FUNC menu. The audio screen shows an overview of the audio channels used and, for each audio channel: the audio input currently selected, whether the audio recording level is adjusted automatically or manually and the audio level indicator.
When the handle unit is attached to the camcorder, set the audio level switch of the desired channel to A (automatic) to let the camcorder automatically adjust that channel’s audio level. If the handle unit is not attached, adjust the audio levels using the FUNC menu.
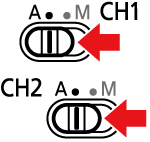
Caution
When the INPUT 1 and INPUT 2 switches are both set to the same type of audio source (line input or microphone), you can link the audio level adjustment for both inputs with the MENU -⋗ [ 

Conversely, you can set MENU -⋗ [ 

When the handle unit is attached to the camcorder, adjust the audio level using the controls on the handle unit. If the handle unit is not attached, adjust the audio levels using the FUNC menu.
1. Set the audio level switch of the desired channel to M (manual).
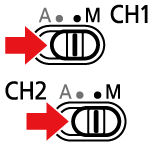
2. Turn the corresponding audio level dial.
Caution
3. Close the protective cover to prevent the audio controls from being changed inadvertently.
When the audio format is LPCM (4-channel audio recording), use the audio screen in the FUNC menu to adjust the audio recording levels for CH3 and CH4. If the handle unit is not attached to the camcorder, you must use the audio screen to adjust the audio recording levels for CH1 and CH2 as well.
1. Select 

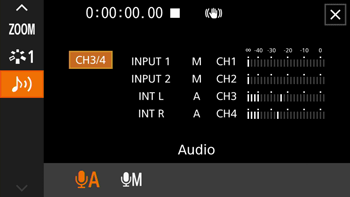
2. Select the channel or pair of channels to adjust.
3. Select [ 

4. Touch and hold [ 

5. Select [ 
Caution
Caution
If at least one of the channels is set to the INPUT terminals and manual audio level adjustment, you can activate the audio limiter to lessen audio distortions. When activated, the audio limiter will limit the amplitude of audio input signals when they start to distort. Use the MENU -⋗ [ 
Microphone Sensitivity (INPUT Terminals)
When one of the audio channels is set to the INPUT terminals and the corresponding INPUT1 or INPUT2 switch is set to MIC or MIC+48V, you can select the external microphone’s sensitivity.
1. [ 
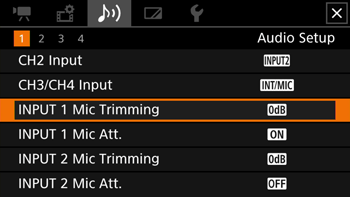
2. Select the desired option.
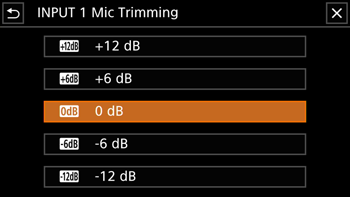
3. Select [ 
Microphone Attenuator (INPUT Terminals)
When one of the audio channels is set to the INPUT terminals and the corresponding INPUT1 or INPUT2 switch is set to MIC or MIC+48V, you can activate the external microphone’s attenuator (20 dB).
1. [ 
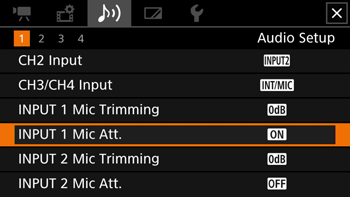
2. Select [ 
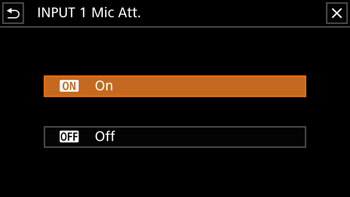
3. Select [ 
 appears on the right of the screen.
Microphone Sensitivity (Built-in Microphone)
When one of the audio channels is set to the built-in microphone/MIC terminal and no external microphone is connected to the MIC terminal, you can increase the built-in microphone's sensitivity.
1. [ 
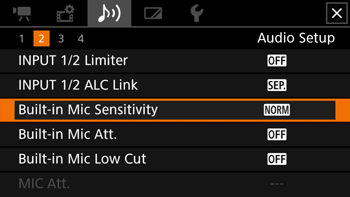
2. Select the desired option.
 Normal]: For recording audio under usual conditions.
 High]: For recording audio at a higher level (+6 db).
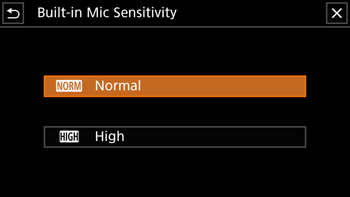
3. Select [ 
Microphone Attenuator (Built-in Microphone)
When one of the audio channels is set to the built-in microphone/MIC terminal and no external microphone is connected to the MIC terminal, you can activate the built-in microphone's attenuator (20 dB) to prevent audio distortions when the audio level is too high.
1. [ 
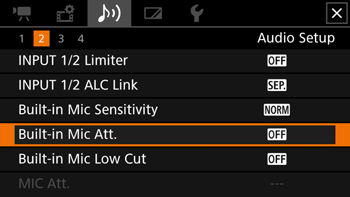
2. Select [ 
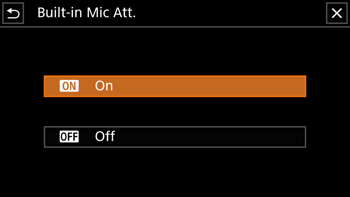
3. Select [ 
 appears on the right of the screen.
Low-Cut Filter (Built-in Microphone)
When one of the audio channels is set to the built-in microphone/MIC terminal and no external microphone is connected to the MIC terminal, you can activate the low cut filter to reduce the sound of blowing wind and other ambient sounds when recording outdoors. When recording in surroundings unaffected by wind or if you want to record low-frequency sounds, we recommend turning off the low-cut filter.
1. [ 
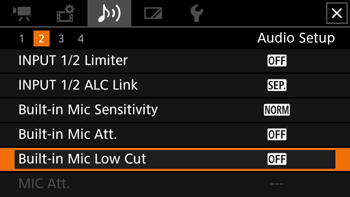
2. Select [ 
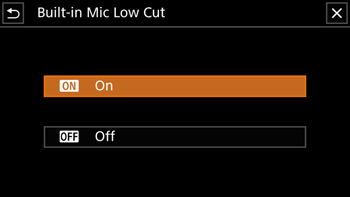
3. Select [ 
Microphone Attenuator (MIC Terminal)
When one of the audio channels is set to the built-in microphone/MIC terminal, you can activate the microphone attenuator (20 dB) for an external microphone connected to the MIC terminal to prevent audio distortions when the audio level is too high.
1. [ 
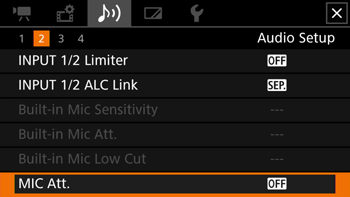
2. Select [ 
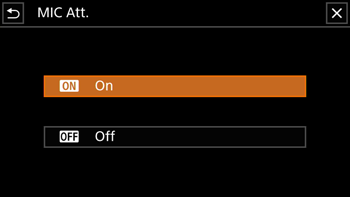
3. Select [ 
 appears on the right of the screen.
Low-Cut Filter (MIC Terminal)
When one of the audio channels is set to the built-in microphone/MIC terminal, you can activate the low-cut filter for an external microphone connected to the MIC terminal. The low-cut filter reduces the sound of blowing wind and other ambient sounds when recording outdoors. When recording in surroundings unaffected by wind or if you want to record low-frequency sounds, we recommend turning off the low-cut filter.
1. [ 
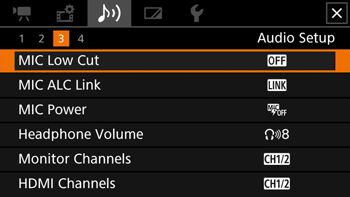
2. Select [ 
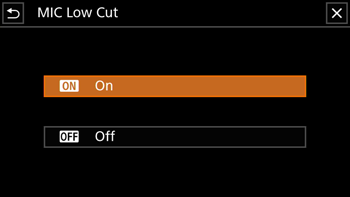
3. Select [ 
Plug-in Power (MIC Terminal)
You can supply plug-in power to an external microphone connected to the MIC terminal.
1. [ 
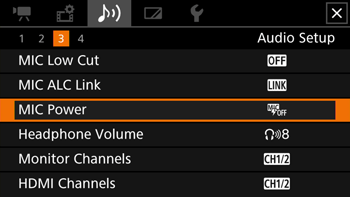
2. Select [ 
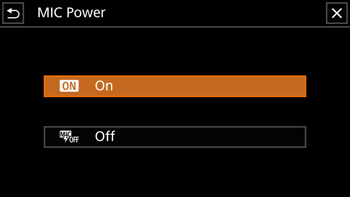
3. Select [ 
Caution
Connecting an external microphone that does not require power supply when [MIC Power] is set to [ 


