

Issue
If an error message is displayed on the LCD, take the corresponding action described below.
Cause and solution
Print head is not installed. Install the print head. U051 The type of print head is incorrect. Install the correct print head. U052 The following ink cartridge cannot be recognized. U053/U059
The FINE Cartridge may not be installed properly, or the Cartridge may not be compatible with this machine.
Open the Scanning Unit (Cover) and install the appropriate FINE Cartridge.
If the error is not resolved, the FINE Cartridge may be damaged. Contact the service center.
Cause and solution
Some ink cartridges are not installed in place U075/U076
Make sure that each FINE Cartridge is installed in the correct position.
When remaining ink cautions or errors occur, the message will appear to inform you of the error.
Refer to [ An Error Message Is Displayed on the LCD ]
Replacing Procedure
When you need to replace FINE Cartridges, follow the procedure below.
Caution
Handling FINE Cartridges

Caution
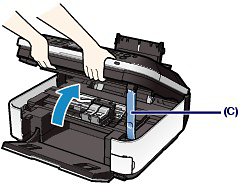
1. Make sure that the power is turned on, and open the Paper Output Tray gently.
2. Lift the Scanning Unit (Cover), then hold it open with the Scanning Unit Support (C).
The FINE Cartridge Holder moves to the replacement position.
Caution
Caution
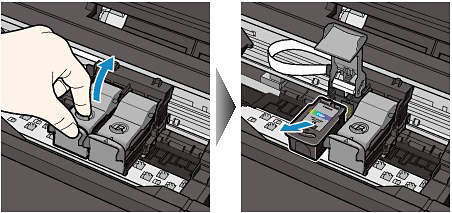
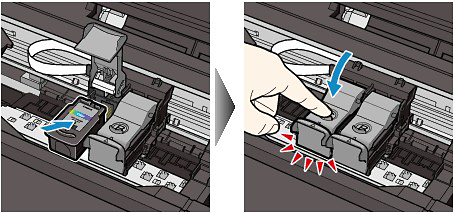
3. Remove the empty FINE Cartridge.
(1) Pinch the tabs and open the Ink Cartridge Locking Cover.
(2) Remove the FINE Cartridge.
Caution
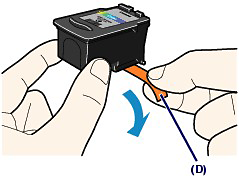
4. Prepare the new FINE Cartridge.
(1) Take a new FINE Cartridge out of its package and remove the orange protective tape (D) gently.
Caution
5. Install the FINE Cartridge.
(1) Put a new FINE Cartridge in the FINE Cartridge Holder.
The Color FINE Cartridge should be installed into the left slot and the Black FINE Cartridge should be installed into the right slot.
(2) Close the Ink Cartridge Locking Cover to lock the FINE Cartridge into place.
Push down the Ink Cartridge Locking Cover until it clicks.
(3) Confirm that the Ink Cartridge Locking Cover is closed correctly.
Caution
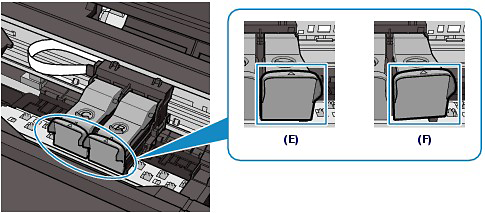
(E) Closed correctly
(F) Not closed correctly (the cover is tilted)
Caution
6. Lift the Scanning Unit (Cover) slightly to set the Scanning Unit Support back to its original position, and gently close the Scanning Unit (Cover).
Caution
Caution
Caution
See [ Aligning the Print Head ]
Cause and solution
The following ink cartridge cannot be recognized U140
The FINE Cartridge may not be compatible with this machine.
Install the FINE Cartridge compatible with this machine.
When remaining ink cautions or errors occur, the message will appear to inform you of the error.
Refer to [ An Error Message Is Displayed on the LCD ]
Replacing Procedure
When you need to replace FINE Cartridges, follow the procedure below.
Caution
Handling FINE Cartridges
Caution
1. Make sure that the power is turned on, and open the Paper Output Tray gently.
2. Lift the Scanning Unit (Cover), then hold it open with the Scanning Unit Support (C).
The FINE Cartridge Holder moves to the replacement position.
Caution
Caution
3. Remove the empty FINE Cartridge.
(1) Pinch the tabs and open the Ink Cartridge Locking Cover.
(2) Remove the FINE Cartridge.
Caution
4. Prepare the new FINE Cartridge.
(1) Take a new FINE Cartridge out of its package and remove the orange protective tape (D) gently.
Caution
5. Install the FINE Cartridge.
(1) Put a new FINE Cartridge in the FINE Cartridge Holder.
The Color FINE Cartridge should be installed into the left slot and the Black FINE Cartridge should be installed into the right slot.
(2) Close the Ink Cartridge Locking Cover to lock the FINE Cartridge into place.
Push down the Ink Cartridge Locking Cover until it clicks.
(3) Confirm that the Ink Cartridge Locking Cover is closed correctly.
Caution
(E) Closed correctly
(F) Not closed correctly (the cover is tilted)
Caution
6. Lift the Scanning Unit (Cover) slightly to set the Scanning Unit Support back to its original position, and gently close the Scanning Unit (Cover).
Caution
Caution
Caution
See [ Aligning the Print Head ]
Cause and solution
The following ink cartridge cannot be recognized U150
The FINE Cartridge may not be installed properly.
Open the Scanning Unit (Cover) and install the appropriate FINE Cartridge.
If the error is not resolved, the FINE Cartridge may be damaged. Contact the service center.
Cause and solution
The ink may have run out. Replacing the ink cartridge is recommended U162
The ink may have run out.
The function for detecting the remaining ink level will be disabled since the ink level cannot be correctly detected.
If you want to continue printing without this function, press the machine's Stop button for at least 5 seconds.
Canon recommends to use new genuine Canon cartridges in order to obtain optimum qualities.
Please be advised that Canon shall not be liable for any malfunction or trouble caused by continuation of printing under the ink out condition.
Caution
-⋗ [ Checking the Ink Status ]
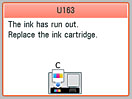
Cause and solution
The Ink has run out. Replace the ink cartridge U163
The ink has run out.
Replace the ink cartridge and close the Scanning Unit (Cover).
If printing is in progress and you want to continue printing, press the machine's Stop button for at least 5 seconds with the ink cartridge installed. Then printing can continue under the ink out condition.
The function for detecting the remaining ink level will be disabled.
Replace the empty ink cartridge immediately after the printing. The resulting print quality is not satisfactory, if printing is continued under the ink out condition.
Caution
-⋗ [ Checking the Ink Status ]
Cause and solution
Data of supported types are not saved
Caution
Cause and solution
Cannot print the specified PDF file. The format is not supported or the file is too large
Caution
- The Details screen is not displayed for the PDF file you want to print.
- Characters other than machine name or MP Navigator EX are displayed on Created with on the Details screen.
- "?" is displayed on the preview screen.
Cause and solution
Cause and solution
The specified PDF file contains unprintable data. Some portions may not be printed
PDF file which contain lot of graphics or hi-resolution images may lose that data or stop before printing is completed. In this case, print from the computer.
Cause and solution
The ink absorber is almost full. Press OK to continue printing. Contact the service center
The ink absorber is almost full.
Press the machine's OK button to continue printing. Contact the service center.
Cause and solution
Printer error has occurred. Contact the service center
The machine error has occurred.
Contact the service center.
Cause and solution
Timeout error has occurred. Press OK
Some errors occurred while copying and a certain time passed.
Press the OK button to dismiss the error, and try to copy again.
Cause and solution
Incompatible device detected. Remove the device
Cause and solution
Failed to scan head alignment sheet. Check orientation/position and check that platen/sheet is clean
Scanning the print head alignment sheet has failed.
Press the OK button to dismiss the error, then take the actions described below.
-⋗ [ Printing the Nozzle Check Pattern ]
If the error is not resolved, connect the machine to the computer and align the Print Head on the printer driver.
-⋗ [ Aligning the Print Head ]
Cause and solution
An unsupported USB hub is connected. Remove the hub
If a PictBridge compliant device is connected via a USB hub, remove the hub and connect it directly to the machine.
Cause and solution
B200 Printer error has occurred. Unplug the power cord and contact the service center
Turn off the machine, and unplug the power cord of the machine from the power supply.
Contact the service center.
Caution
Cause and solution
**** Printer error has occurred. Turn off power then back on again. If problem persists, see the manual
"****" is displayed in the alphanumeric character and depends on the error occurred.
Cancel printing, turn off the machine. Then clear the jammed paper or protective material that is preventing the FINE Cartridge Holder from moving, and turn on the machine again.
Caution
Cause and solution
If any object is placed in front of the machine, remove it.
Open the Paper Output Tray gently, then turn the power off and back on.
Turn off the machine, and unplug the power cord of the machine from the power supply.
Plug the machine back in and turn the machine back on.
If the problem is not resolved, contact the service center.
Cause and solution
Document in ADF. Check document in ADF, then press OK and redo operation
The document is jammed in the ADF. Remove the document page jammed in the ADF, then press the OK button. Operate again after resolving the error.
Cause and solution
Document size is too long. Check document in ADF, then press OK and redo operation
The document is too long or is jammed in the ADF.
Remove the document page jammed in the ADF, then press the OK button. After resolving the error, make sure that the document you are loading meets the machine's requirements before redoing the operation.
Cause and solution
Paper output tray is closed. Open the paper output tray and press OK
Open the Paper Output Tray, then press the OK button.
Cause and solution
The card is currently writable from PC. Set to [Not writable from PC]
The Card Slot is set to Writable from USB PC or Writable from LAN PC.
You cannot print from the memory card or save the scanned data to the memory card when the Card Slot is set to Writable from USB PC or Writable from LAN PC. After writing on the memory card, set to Not writable from PC again.