Issue
Cause and solution
Check 1: Is the power turned on?
A: ON button
B: In Use/Memory lamp
Cause and solution
Check 2: Is the document being sent from memory or the fax being received into memory?
When the In Use/Memory lamp is flashing, a fax is being sent from/received into memory. Wait until the transmission/reception is complete.
In the following cases, the machine is not able to print the received fax and will automatically store the fax in its memory.
Caution
Caution
Printing a Document in Memory
If the machine was not able to send a fax or print a received fax, it stores the unsent or unprinted fax in its memory. If an error occurred during a fax transmission, the document is not stored in memory. You can print a list of stored documents (the memory list) or print a specified document.
Caution
- Printing a Memory List or Specified Document in Memory
1. Load paper.
Refer to [ Loading Paper ]
2. Press the FAX button, then press the right Function button.
The memory reference screen is displayed.
3. Print a specified document or memory list.
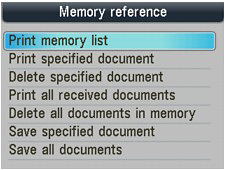
(1) Use the 
(2) Use the 
The memory list stored in memory is printed.
(1) Use the 
(2) Use the 
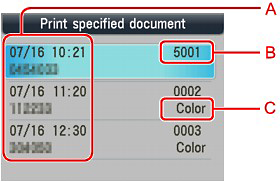
The date and time of transaction and fax/telephone number, the transaction number, and the color information are displayed on a list screen of documents stored in memory.
A: Date and time of transaction and fax/telephone number
B: Transaction number (TX/RX NO.)
A transaction number from 0001 to 4999 indicates a document being sent.
A transaction number from 5001 to 9999 indicates a document being received.
C: Color information
(3) Use the 
If you select Yes, only the first page of the document will be printed. If you select No, all pages of the document will be printed.
To print other documents, repeat the procedure from steps 2 and 3.
Caution
- Printing All the Documents in Memory
1. Load paper.
Refer to [ Loading Paper ]
2. Press the FAX button, then press the right Function button.
The memory reference screen is displayed.
3. Use the 
4. Use the 
Caution
Deleting a Document in Memory
- Deleting a Specified Document in Memory
1. Press the FAX button, then press the right Function button.
The memory reference screen is displayed.
2. Use the 
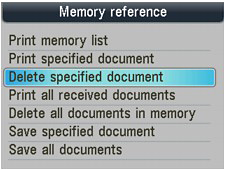
3. Use the 
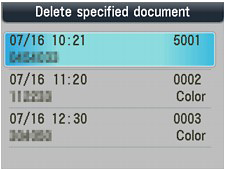
4. Use the 
To delete other documents, repeat the procedure from steps 3 and 4.
- Deleting All the Documents in Memory
1. Press the FAX button, then press the right Function button.
The memory reference screen is displayed.
2. Use the 
3. Use the 
Caution
Saving a Document in Memory to a Memory Card/USB Flash Drive
You can save sent/received faxes on a memory card or a USB flash drive as PDF files using the Operation Panel of the machine.
Caution
1. Press the FAX button, then press the right Function button.
The memory reference screen is displayed.
2. Insert the USB flash drive into the Direct Print Port or the memory card into the Card Slot.
Caution
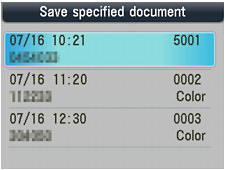
3. Use the 
4. Use the 
All the documents are saved on the selected destination.
Proceed to step 5.
5. Use the 
The specified document is saved.
To save other documents, repeat step 5.
6. Press the Back button or Stop button.
Caution
- Folder name: CANON_SC\FAXDOC\0001
- File name (file extension: PDF): Running numbers, starting from FAX_0001
- File date: The date and time of saving as set in the machine.
You can import faxes saved on a memory card to the computer using the Card Slot on the machine.
You can import faxes saved on a USB flash drive to the computer.
After saving faxes, connect the USB flash drive to the computer, then import the data using Windows Explorer.
Cause and solution
Check 3: Is the telephone line connected to the External Device Jack?
Reconnect it to the Telephone Line Jack. Refer to [ Prepare the Machine ]
If you still cannot send a fax, there is a problem with the telephone line. Contact your telephone company and the manufacturer of your terminal adapter or telephone adapter.
For the basic connection of the machine, refer to [ Prepare the Machine ]. This guide describes other typical connections.
The machine cannot send/receive faxes if the connection is incorrect. Connect the machine correctly.
Caution
If the Power Disconnects Unexpectedly
- If the power disconnects, the following will apply:
Connecting Various Lines
These are examples and could not be guaranteed to suit every connecting condition. For details, refer to the instruction manual supplied with the network device (control devices such as an xDSL (Digital Subscriber Line) modem or terminal adapter) you are connecting to this machine.
Caution
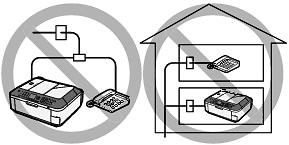
Do not connect fax machines and/or telephones in parallel (US and Canada only)
- If you pick up the handset of the telephone that is connected in parallel during fax transmission or reception, the fax image may be corrupted or a communication error may occur.
- Such services as Caller ID, etc. may not operate properly on the telephone.
Caution
Connecting the telephone
For users in the UK
 (External device) jack.
- Connecting to an Internet Telephone
(A) Digital Subscriber Line
(B) xDSL modem (splitter may not be built-in to the modem)
(C) WAN (Wide Area Network)
(D) Broadband router compatible with Internet Telephone
(E) Computer
(F) Telephone or answering machine
(G) LAN (Local Area Network)
(H) TEL
(I) LINE
* Port configurations and names may vary depending on the product.
Caution
See [ Setting the Telephone Line Type ]
- Connecting to an xDSL
(A) Digital Subscriber Line
(B) xDSL modem (splitter may not be built-in to the modem)
(C) Computer
(D) Telephone or answering machine
Caution
Caution
See [ Setting the Telephone Line Type ]
- Connecting to an ISDN Line
For details on ISDN (Integrated Service Digital Network) connection and settings, refer to the manuals supplied with your terminal adapter or dial-up router.
Setting the Telephone Line Type
Before using your machine, make sure you set the correct telephone line type for your telephone line. If you are unsure of your telephone line type, contact your telephone company. For xDSL or ISDN connections, contact the telephone company or service provider to confirm your line type.
Caution
1. Display the Telephone line type screen.
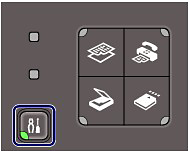
(1) Press the Setup button.
(2) Select Device settings 
(3) Select FAX settings, and press the OK button.
(4) Select FAX user settings, and press the OK button.
(5) Select Telephone line type, and press the OK button.
2. Select the telephone line type.
(1) Select the telephone line type.
Rotary pulse: Suitable for pulse dialing.
Touch tone: Suitable for tone dialing.
(2) Press the OK button.
3. Press the FAX button to return to the fax standby screen.
Cause and solution
Check 4: Is the telephone line type set correctly?
Check the telephone line type setting and change it as necessary.
For the basic connection of the machine, refer to [ Prepare the Machine ]. This guide describes other typical connections.
The machine cannot send/receive faxes if the connection is incorrect. Connect the machine correctly.
Caution
If the Power Disconnects Unexpectedly
- If the power disconnects, the following will apply:
Connecting Various Lines
These are examples and could not be guaranteed to suit every connecting condition. For details, refer to the instruction manual supplied with the network device (control devices such as an xDSL (Digital Subscriber Line) modem or terminal adapter) you are connecting to this machine.
Caution
Do not connect fax machines and/or telephones in parallel (US and Canada only)
- If you pick up the handset of the telephone that is connected in parallel during fax transmission or reception, the fax image may be corrupted or a communication error may occur.
- Such services as Caller ID, etc. may not operate properly on the telephone.
Caution
Connecting the telephone
For users in the UK
 (External device) jack.
- Connecting to an Internet Telephone
(A) Digital Subscriber Line
(B) xDSL modem (splitter may not be built-in to the modem)
(C) WAN (Wide Area Network)
(D) Broadband router compatible with Internet Telephone
(E) Computer
(F) Telephone or answering machine
(G) LAN (Local Area Network)
(H) TEL
(I) LINE
* Port configurations and names may vary depending on the product.
Caution
See [ Setting the Telephone Line Type ]
- Connecting to an xDSL
(A) Digital Subscriber Line
(B) xDSL modem (splitter may not be built-in to the modem)
(C) Computer
(D) Telephone or answering machine
Caution
Caution
See [ Setting the Telephone Line Type ]
- Connecting to an ISDN Line
For details on ISDN (Integrated Service Digital Network) connection and settings, refer to the manuals supplied with your terminal adapter or dial-up router.
Setting the Telephone Line Type
Before using your machine, make sure you set the correct telephone line type for your telephone line. If you are unsure of your telephone line type, contact your telephone company. For xDSL or ISDN connections, contact the telephone company or service provider to confirm your line type.
Caution
1. Display the Telephone line type screen.
(1) Press the Setup button.
(2) Select Device settings 
(3) Select FAX settings, and press the OK button.
(4) Select FAX user settings, and press the OK button.
(5) Select Telephone line type, and press the OK button.
2. Select the telephone line type.
(1) Select the telephone line type.
Rotary pulse: Suitable for pulse dialing.
Touch tone: Suitable for tone dialing.
(2) Press the OK button.
3. Press the FAX button to return to the fax standby screen.
Cause and solution
Check 5: Is Hook key setting set to Disable?
When you send a fax manually, dial the number with Hook key setting set to Enable, or dial the number using the telephone connected to the machine.
Cause and solution
Check 6: Is Dial tone detect set to ON?
Resend the fax after a while. If you still cannot send the fax, set Dial tone detect to OFF.
Cause and solution
Check 7: Is Check RX fax information set to ON?
When Check RX fax information is set to ON, after the machine confirms that the terminal information of the person you want to contact corresponds with the fax number you dialed, the machine will send a fax.
If the machine cannot confirm the terminal information of the person you want to contact, or the fax number you dialed does not correspond with that information, the message "Fax info does not match" is displayed, and the job of sending fax is cancelled.
Cause and solution
Check 8: Is the fax number registered correctly for speed dialing?
Make sure that the fax number is registered correctly for speed dialing.
Speed dialing allows you to dial fax/telephone numbers by simply pressing a few buttons.
The following speed dialing methods are available:
Register a fax/telephone number for coded speed dialing. To dial the number, press the Coded Dial button, then enter the two-digit code assigned to that number, or use the 
-⋗ [ Registering Coded Speed Dial Numbers ]
Register two or more registered speed dial numbers for group dialing. You can send the same document to all members in the group.
-⋗ [ Registering Group Dial Numbers ]
Caution
Registering Coded Speed Dial Numbers
Before you can use the coded speed dialing feature, you need to register the recipients' numbers.
The LCD may differ depending on the machine you are using.
The LCDs of MX870 series are used for explanation.
Caution
1. Press the FAX button, then press the left Function button.
The FAX menu screen is displayed.
2. Select 
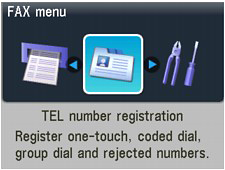
3. Use the 
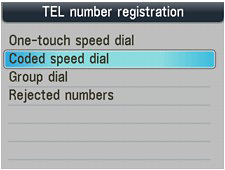
4. Use the Numeric buttons or the 
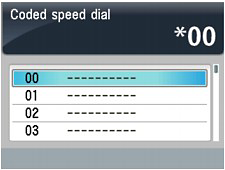
5. Use the 
6. Use the Numeric buttons to enter a name for the coded speed dial code (max. 16 characters, including spaces), then press the OK or the 
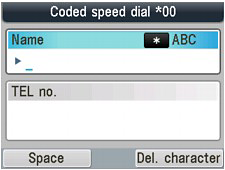
Caution
7. Use the Numeric buttons to enter the fax/telephone number (max. 60 digits (40 digits for the US, Canada, and Korea), including spaces) you want to register.
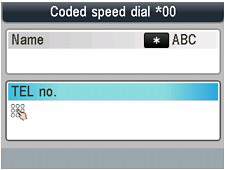
Caution
8. Press the OK button to finalize registration.
Caution
Registering Group Dial Numbers
To send the same document to several recipients successively, select the numbers you registered to the speed dial codes and register them to a group dial.
The LCD may differ depending on the machine you are using.
The LCDs of MX870 series are used for explanation.
Caution
1. Press the FAX button, then press the left Function button.
The FAX menu screen is displayed.
2. Select 
3. Use the 
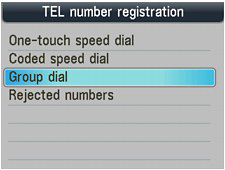
MX870 series users: Go to step 4.
MX350 series users: Go to step 5.
4. Use the 
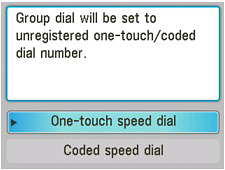
5. Select the speed dial code to register the group dial.
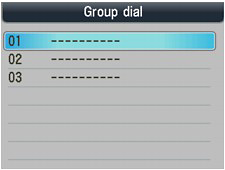
Use the 
Use the Numeric buttons or the 
Caution
6. Use the Numeric buttons to enter a name for the group (max. 16 characters, including spaces), then press the OK or the 
Caution
7. Enter the speed dial code you want to register in the group.
After pressing the Coded Dial button, use the Numeric buttons or the 
If Enter first letter. is displayed on the LCD, enter the first letter for the registered name of the speed dial code.
Caution

 button.
 button to select the speed dial code, then press the right Function button.
8. Press the OK button to finalize registration.
Caution
Cause and solution
Check 9: Does an error occur during transmission?
-⋗ [ A Message for Faxing Is Displayed on the LCD ]
Cause and solution
Check 10: Is the telephone line connected correctly?
Check that the telephone line is connected correctly to the proper jack. If so, then there is a problem with your telephone line. Contact your telephone company.
For the basic connection of the machine, refer to [ Prepare the Machine ]. This guide describes other typical connections.
The machine cannot send/receive faxes if the connection is incorrect. Connect the machine correctly.
Caution
If the Power Disconnects Unexpectedly
- If the power disconnects, the following will apply:
Connecting Various Lines
These are examples and could not be guaranteed to suit every connecting condition. For details, refer to the instruction manual supplied with the network device (control devices such as an xDSL (Digital Subscriber Line) modem or terminal adapter) you are connecting to this machine.
Caution
Do not connect fax machines and/or telephones in parallel (US and Canada only)
- If you pick up the handset of the telephone that is connected in parallel during fax transmission or reception, the fax image may be corrupted or a communication error may occur.
- Such services as Caller ID, etc. may not operate properly on the telephone.
Caution
Connecting the telephone
For users in the UK
 (External device) jack.
- Connecting to an Internet Telephone
(A) Digital Subscriber Line
(B) xDSL modem (splitter may not be built-in to the modem)
(C) WAN (Wide Area Network)
(D) Broadband router compatible with Internet Telephone
(E) Computer
(F) Telephone or answering machine
(G) LAN (Local Area Network)
(H) TEL
(I) LINE
* Port configurations and names may vary depending on the product.
Caution
See [ Setting the Telephone Line Type ]
- Connecting to an xDSL
(A) Digital Subscriber Line
(B) xDSL modem (splitter may not be built-in to the modem)
(C) Computer
(D) Telephone or answering machine
Caution
Caution
See [ Setting the Telephone Line Type ]
- Connecting to an ISDN Line
For details on ISDN (Integrated Service Digital Network) connection and settings, refer to the manuals supplied with your terminal adapter or dial-up router.
Setting the Telephone Line Type
Before using your machine, make sure you set the correct telephone line type for your telephone line. If you are unsure of your telephone line type, contact your telephone company. For xDSL or ISDN connections, contact the telephone company or service provider to confirm your line type.
Caution
1. Display the Telephone line type screen.
(1) Press the Setup button.
(2) Select Device settings 
(3) Select FAX settings, and press the OK button.
(4) Select FAX user settings, and press the OK button.
(5) Select Telephone line type, and press the OK button.
2. Select the telephone line type.
(1) Select the telephone line type.
Rotary pulse: Suitable for pulse dialing.
Touch tone: Suitable for tone dialing.
(2) Press the OK button.
3. Press the FAX button to return to the fax standby screen.
Cause and solution
Check 11: Is the document loaded properly?
Remove the document, then reload it on the Platen Glass or in the ADF.
Cause and solution
Check 12: Does a printer error occur?
Check the error message on the LCD, then resolve the problem.
-⋗ [ An Error Message Is Displayed on the LCD ]
If you are in a hurry, press the Stop button to close the message, then send the fax.


