Solution
In [  ] mode, the camera automatically zooms in and out to keep a detected face at a constant size. If the person moves closer, the camera automatically zooms out, and vice versa. This size can also be adjusted, as needed.
Caution
1. Press the power button to turn the camera on.
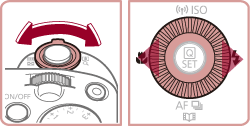
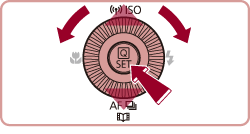
2. Press the [MENU] button.
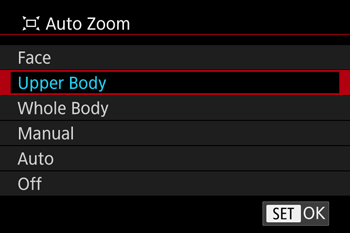
5. To adjust the Constant Face Display Size, refer to the table shown below and select the desired option by pressing the [  ], [
], [  ] buttons, and then press the [
  ] button.
([Upper Body] has been selected in the example image below.)
| Auto | Auto zoom to prevent subjects from moving off the screen. When multiple faces are detected, the camera zooms to keep these subjects on the screen. |
| Face | Keep faces large enough to show facial expressions clearly. |
| Upper Body | Keep faces small enough to show the person’s upper body. |
| Whole Body | Keep faces small enough to show the person’s entire body. |
| Manual | Keep faces at the size specified by moving the zoom lever. Release the zoom lever once the desired size has been obtained. |
6. Press the [MENU] button to set the camera to shooting mode.
7. Select [ ] mode.
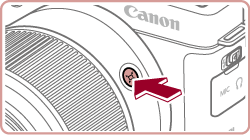
Press and release the [ ] button quickly. [ ] is displayed.
Caution
Pressing and holding the [ ] button will set the camera to (Framing Assist – Seek) mode.
A white frame is displayed around the detected face, and the camera zooms in and out to keep the subject on the screen.
When multiple faces are detected, a white frame is displayed around the main subject’s face and up to two gray frames around other faces, as the camera zooms to keep these subjects on the screen.
Caution
8. Shoot.
Auto zooming continues even after you shoot, and the frames are still displayed.
To cancel constant face display size, press the [
] button again. [
Auto: Off] is displayed.
Caution
A face may not be displayed at a constant size at some zoom factors, or if the subject’s head is tilted or facing the camera indirectly.
During movie recording, a changed zoom factor and camera operating sounds are recorded.
When [
] Auto is on, some shooting information is not displayed, and some shooting settings cannot be configured.
Auto zooming to keep multiple subjects on the screen is not performed during movie recording, even if faces are detected.
You can zoom in or out with the zoom lever, but the original zoom factor will be restored in a few seconds after you release the lever.
Auto zooming is not performed during continuous shooting.
Caution
If multiple faces are detected in step 6, you can change the face used as the main subject by touching the face or pressing the [

] button. However, the [
] button cannot be used for selection during movie recording.
When a detected subject moves toward the edge of the screen, the camera zooms out to keep the subject on the screen.
The zoom factor cannot be changed after you press the shutter button all the way down in self-timer mode.
The camera prioritizes zooming to keep subjects on the screen. For this reason, it may not be possible to maintain a constant face display size, depending on subject movement and shooting conditions.
When no face is detected, the camera zooms to a certain level and stops zooming until a face is detected.
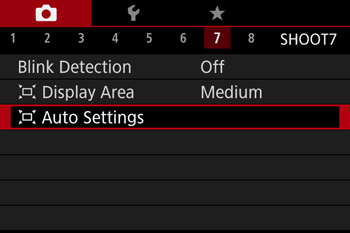
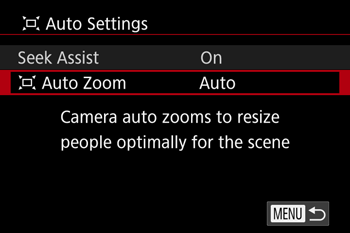
The face size can also be adjusted in MENU ⋗ [

7] tab ⋗ [ Auto Settings] ⋗ [ Auto Zoom]. You can choose [Off] to deactivate this feature.
You can zoom in or out with the zoom lever when [Face], [Upper Body], or [Whole Body] is selected, but the original zoom factor will be restored in a few seconds after you release the lever.
You can clear your specified face size during movie recording by pressing the [
] button


 ].
].