

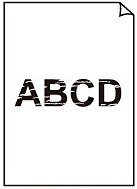
Issue


Cause and solution
Check 1: Did you confirm the paper and print quality settings?
Cause and solution
Check 2: Check the status of ink tanks. Replace the ink tank if the ink has run out
When the ink tanks run out of ink, follow the procedure below to replace them.
Caution
Caution
Color ink may be consumed even when printing a black-and-white document or when black-and-white printing is specified.
Every ink is also consumed in the standard cleaning and deep cleaning of the Print Head, which may be necessary to maintain the machine's performance. When an ink tank is out of ink, replace it immediately with a new one.
1. Make sure that the power is turned on, and open the Paper Output Tray gently.
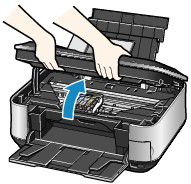
2. Lift the Scanning Unit (Cover) until it stops.
The Print Head Holder moves to the replacement position.
Caution
Do not hold the Print Head Holder to stop or move it forcibly. Do not touch the Print Head Holder until it stops completely.
Caution
Caution
The machine may make operating noise when the Print Head Holder moves to the replacement position.
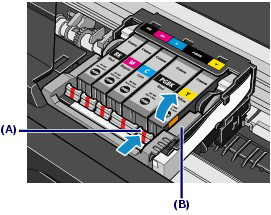
3. Remove the ink tank with the lamp flashing fast.
Push the tab (A) and lift the ink tank to remove.
Do not touch the Print Head Lock Lever (B).
Caution
Caution
4. Prepare the new ink tank.
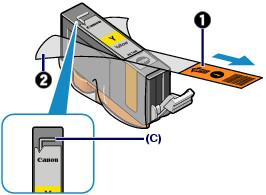
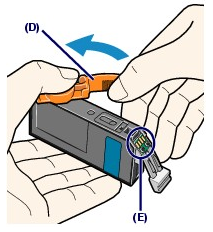
(1) Take a new ink tank out of its package, pull the orange tape (

Caution
Make sure that the film is completely removed from the air hole (C).
If the air hole is blocked with the remaining film, ink may leak out or may not eject properly.
(2) Hold the orange protective cap (D) as indicated in the figure below, then twist and remove it from the bottom of the ink tank.
Remove the protective cap while holding it to prevent the ink from staining your fingers.
Discard the protective cap once it is removed.
Caution
Do not touch the electrical contacts (E) on the ink tank. It can cause the machine to malfunction or become unable to print.
Caution
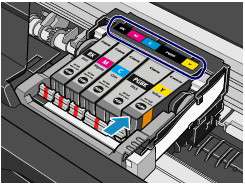
5. Install the new ink tank.
(1) Insert the front end of ink tank into the Print Head at a slant.
Make sure that the position of the ink tank matches the label.
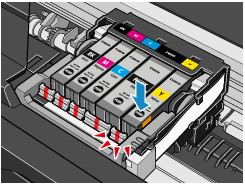
(2) Press the mark 
Make sure that the ink lamp lights up red.
Caution
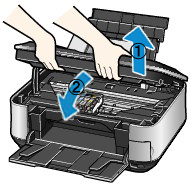
6. Close the Scanning Unit (Cover) gently.
Caution
Be sure to hold the Scanning Unit (Cover) firmly using both hands, and be careful not to get your fingers caught.
Caution
Do not hold the LCD or the Operation Panel.
Caution
Cause and solution
Check 3: Is the orange tape or protective film remaining?
Make sure that all of the protective film is peeled off and the air hole is exposed, as illustrated in (A).
If the orange tape is left as in (B), pull the orange tape and remove it.

Cause and solution
Check 4: Print the Nozzle Check Pattern and perform any necessary maintenance operations such as Print Head Cleaning
Print the Nozzle Check Pattern to determine whether the ink ejects properly from the print head nozzles.
Refer to [ Printing the Nozzle Check Pattern ], [ Cleaning the Print Head ], [ Cleaning the Print Head Deeply ].
Check to see if a particular color's ink tank is not empty.
If the Nozzle Check Pattern is not printed correctly though ink is sufficient, perform the Print Head Cleaning and try printing the Nozzle Check Pattern again.
Perform the Print Head Deep Cleaning.
If the problem is not resolved after performing the Print Head Deep Cleaning, turn off the machine and perform another Print Head Deep Cleaning after 24 hours.
If Print Head Deep Cleaning does not resolve the problem, the Print Head may be damaged. Contact the service center.
Cause and solution
Check 5: When using paper with one printable surface, make sure that the paper is loaded with the printable side facing up
Printing on the wrong side of such paper may cause unclear prints or prints with reduced quality.
Refer to the paper's instruction manual for detailed information on the printable side.
Cause and solution
Check 6: Is the Platen Glass dirty?
Clean the Platen Glass.
Caution
Be sure to turn off the power and disconnect the power plug before cleaning the machine.
With a clean, soft, lint-free cloth, wipe the Platen Glass (A) and the inner side of the Document Cover (white sheet) (B) gently. Be sure not to leave any residue, especially on the Platen Glass.
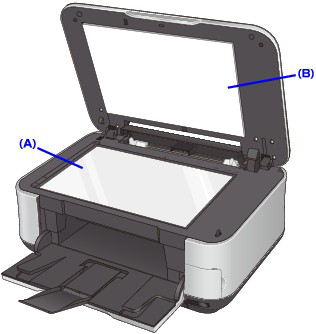
Caution
The inner side of the Document Cover (white sheet) (B) is easily damaged, so wipe it gently.
Cause and solution
Check 7: Make sure that the original is properly loaded on the Platen Glass.
Cause and solution
Check 8: Is the original loaded with the side to be copied facing down on the Platen Glass?
Cause and solution
Check 9: Did you copy a printout done by this machine?
Print from the memory card, from the USB flash drive, or from the digital camera directly, or reprint from the computer.
If you copy a ducument/image printed by this machine, print quality may be reduced.