


Solution
Document Jams in the FeederPaper Jams in the Multi-Purpose Tray
Paper Jams in the Paper Drawer
Paper Jams in the Output Area
Paper Jams inside the Machine
Paper Jams at the Duplex Transport Guide
If a paper jams, ⋖Paper jammed.⋗ is displayed on the screen. Tap ⋖Next⋗ to display simple solutions*. If it is difficult to understand the procedures on the display, see the following sections to clear jams.
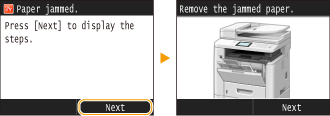
* If the solution is not displayed, press 
Caution
When removing the jammed paper, do not turn OFF the machine
If paper tears
If paper jams repeatedly
Do not forcibly remove the jammed document or paper from the machine
Document Jams in the Feeder
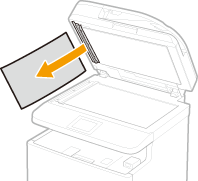
If there are documents placed in the feeder, remove them first. Then, follow the procedure below. Do not forcibly remove jammed paper from the machine. If the jammed paper cannot be removed easily, proceed to the next step.
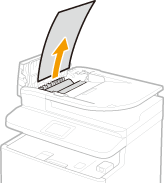
1. Remove the jammed document from the feeder cover.
1-1. Open the feeder cover.

1-2. Move the lever to unlock.
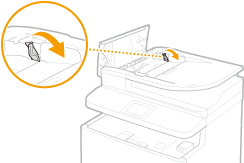
1-3. Gently pull out the document.
2. Remove the jammed document from the inner cover inside the feeder.
2-1. Hold the green knob, and open the inner cover.
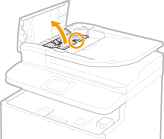
2-2. Gently pull out the document.
2-3. Lift the document tray, and gently pull out the document.
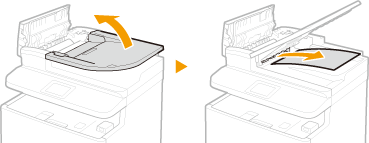
2-4. Return the document tray back to position, and close the inner cover.
3. Return the lever back in place, and close the feeder cover.
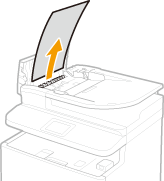
4. Remove the jammed document from the underside of the feeder.
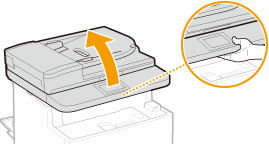
4-1. Open the feeder.
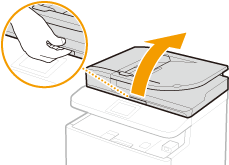
4-2. Gently pull out the document.
4-3. Gently close the feeder.
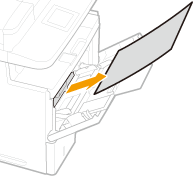
Paper Jams in the Multi-Purpose Tray
If there is paper loaded in the tray, remove it first. If the jammed paper cannot be removed easily, do not forcibly pull it out, but follow the procedure for a different paper jam location indicated by the message.
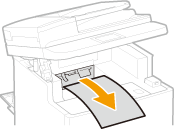
1. Gently pull out the paper.
2. Load the paper. [ Loading Paper in the Multi-Purpose Tray ]
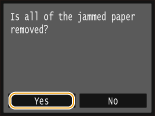
3. When the following message is displayed, tap ⋖Yes⋗.
Paper Jams in the Paper Drawer
If the jammed paper cannot be removed easily, do not forcibly pull it out, but follow the procedure for a different paper jam location indicated by the message.
1. Pull out the paper drawer.
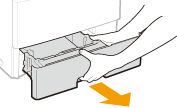

2. Gently pull out the paper.

3. Set the paper drawer.
4. When the following message is displayed, tap ⋖Yes⋗.

Paper Jams in the Output Area
Do not forcibly remove jammed paper from the machine. If the jammed paper cannot be removed easily, proceed to the next step.
1. Fully open the sub-output tray.
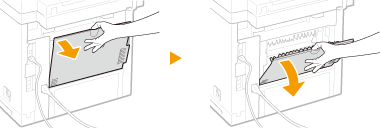
2. Lift the operation panel.
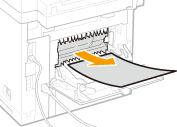
3. Gently pull out the paper.
4. Lower the operation panel.
5. Gently pull out the paper.
6. Close the sub-output tray.
7. When the following message is displayed, tap ⋖Yes⋗.
Paper Jams inside the Machine
Do not forcibly remove jammed paper from the machine. If the jammed paper cannot be removed easily, proceed to the next step.
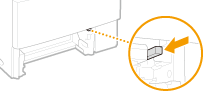
1. Open the front cover while holding down on the button.
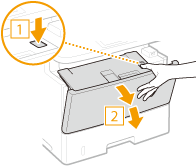
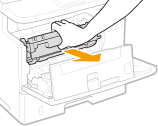
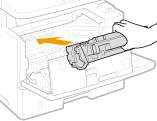
2. Remove the toner cartridge.
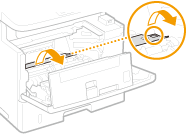
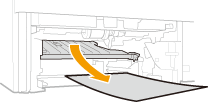
3. Hold the green knob located toward the back and raise the transport guide.
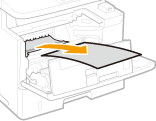
4. Gently pull out the paper.
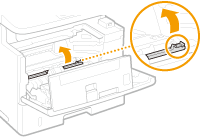
5. Gently return the transport guide back to position.
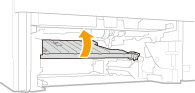
6. Hold the green knob located toward the front and raise the transport guide.
7. Gently pull out the paper.

8. Gently return the transport guide back to position.
9. Install the toner cartridge.
10. Close the front cover.
Paper Jams at the Duplex Transport Guide
If the jammed paper cannot be removed easily, do not forcibly pull it out, but follow the procedure for a different paper jam location indicated by the message.
1. Pull out the paper drawer.
2. Push the green lock release switch to open the duplex transport guide.
3. Gently pull out the paper.
4. Return the guide back to position.
5. Set the paper drawer.
6. When the following message is displayed, tap ⋖Yes⋗.