

Solution
Caution
When there is insufficient free hard disk space, a message will appear during the installation. Stop the installation and increase the free space of the disk, and then install the printer driver again.
Caution
1. Make sure that the computer and printer are connected via the network.
2. Make sure that the printer is ON.
3. Turn the computer on and start up Windows.
Caution
If you are using Windows 2000/XP/Server 2003/Vista, be sure to log on as a user with administrator rights when starting up. If you are not sure about the permissions, ask your computer administrator.
4. Insert the CD-ROM supplied with the printer into the CD-ROM drive.
If the CD-ROM is already in the drive, eject the disk and re-insert it into the drive.
Caution
- If you are using an operating system other than Windows Vista, select [Run] from the [Start] menu, enter "D:\English\MInst.exe", and then click [OK].
- If you are using Windows Vista, enter "D:\English\MInst.exe" in [Start Search] under the [Start] menu, and then press the [ENTER] key on your keyboard.
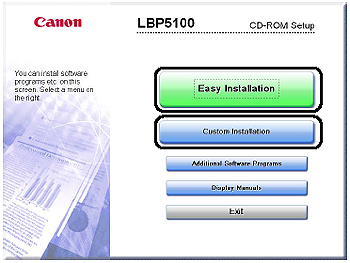
5. Click [Easy Installation] or [Custom Installation].
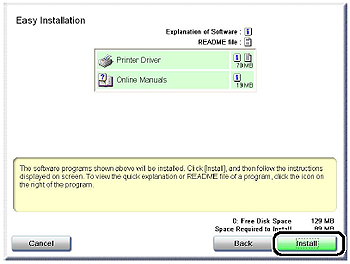
6. Click [Install].
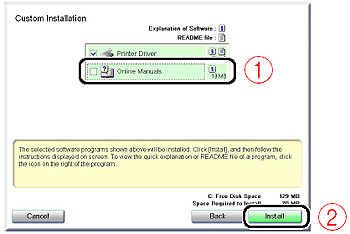
If you selected [Custom Installation] in Step 5, clear the [Online Manuals] check box (1), and then click [Install] (2).
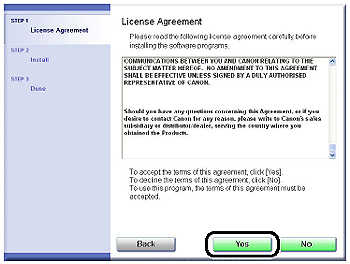
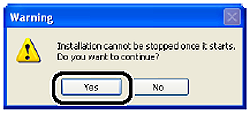
7. Confirm the contents, then click [Yes].
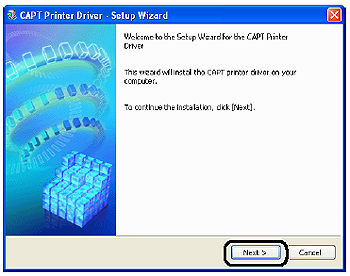
8. Click [Next].
9. Select [Search for Network Printers to Install] (1), then click [Next] (2).
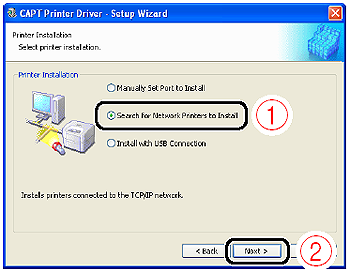
The TCP/IP port on the network is searched, and the printer is detected automatically.
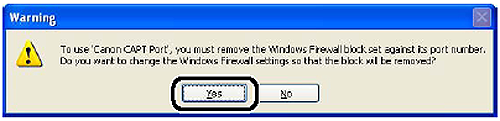
If you are using Windows XP SP2 or another operating system equipped with Windows Firewall, and the Windows Firewall is enabled, the following screen is displayed.
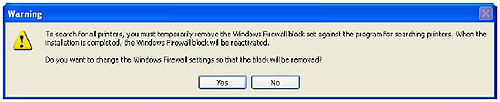
If the IP address of the printer has been already set, click [No].
If you want to clear the block and detect the printers in which the IP address has not been set yet, click [Yes].
10. Operation procedure varies depending on the content displayed in [Product Name] in [Printer List].
Caution
- Make sure that the computer and printer are connected via the network and that the printer is ON.
- Click [Auto Search Again]. The printers on the network are searched for again.
- Click [Manual Search by IP Address]. By entering the IP address of the printer to be installed in the displayed [Manual Search by IP Address] dialog box and clicking [OK], the printer that has the entered IP address is searched for (Enter the IP address by separating the numbers with a period (.), for example, AAA.BBB.C.DD).

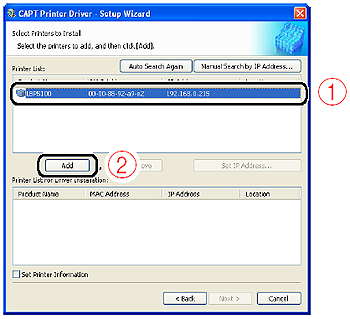
10-A-1. Select the printer to be installed (1), then click [Add] (2).
Caution
Depending on the system environment, "192.168.0.215" (the default value for the network board) is displayed in [IP Address] under [Printer List]. If you want to change the IP address, see [IP Address Setting] to change the IP address after finishing the installation.
If you changed the IP address after installing the printer driver, see [After Changing the IP Address (Changing the Port)] and set the port anew.
10-A-2. Proceed to Step 11.
10-B-1. Select the printer displayed as [Unknown Device] (1), then click [Set IP Address] (2).
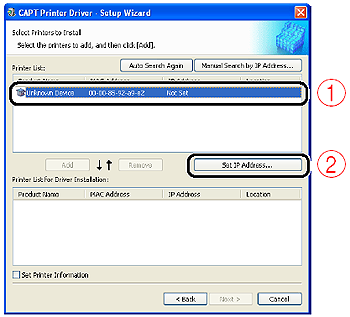
Caution
If more than one [Unknown Device] are displayed, turn off the devices other than the printer to be installed or remove the devices from the network, and then click [Auto Search Again]. After completing the settings for the printer, restore the devices to their original states.
10-B-2. Enter the IP address of the printer in the [Set IP Address] dialog box (1), then click [OK] (2).
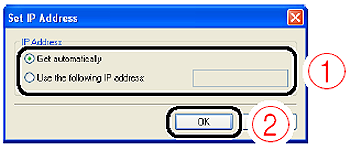
[Get automatically]: Obtain an IP address using DHCP (The DHCP server needs to be started up.). For more details on configuring the DHCP server, ask your network administrator.
[Use the following IP address]: Specify the IP address directly (Enter the IP address by separating the numbers with a period (.), for example, AAA.BBB.C.DD).
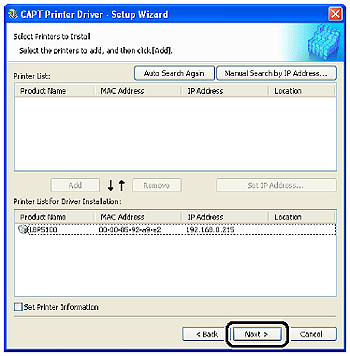
10-B-3. Select the printer to be installed (1), then click [Add] (2).

10-B-4. Proceed to Step 11.
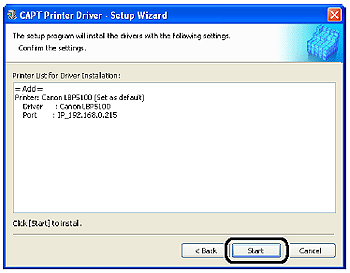
11. Make sure that the name of the printer is added to [Printer List for Driver Installation].
Caution
This procedure allows you to specify the settings for printer information such as the printer sharing settings. You can also specify these settings in the [Printers and Faxes] folder or the [Printers] folder after the installation.
11-A-1. Click [Next].
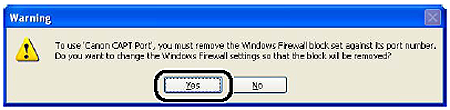
If the following screen appears, click [Yes].
The following port is created.
| Printer | Operating System | Port to Be Created |
| LBP3310 | Windows 2000/XP/Server 2003/Vista | Standard TCP/IP Port |
| LBP5100 | Windows 2000/XP/Server 2003/Vista | |
| Windows 98/Me | Canon CAPT Port | |
| LBP5000/3300 | Windows 98/Me/2000/XP/Server 2003/Vista |
11-A-2. Proceed to Step 12.
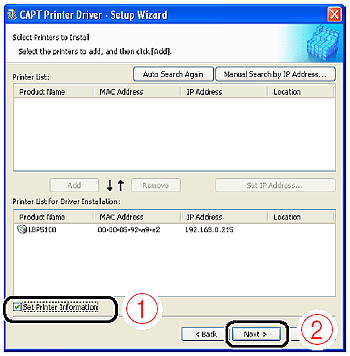
11-B-1. Select the [Set Printer Information] check box (1), then click [Next] (2).
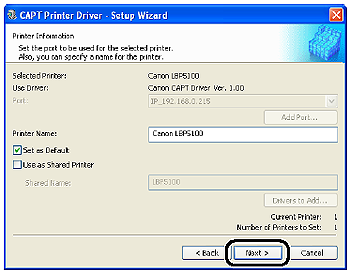
11-B-2. Specify the settings for printer information.
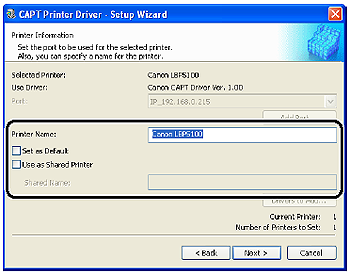
Options to be specified
[Printer Name]: Enter a new name in [Printer Name] if you want to change the printer name.
[Set as Default]: If you want to use the printer as the default printer, select the [Set as Default] check box.
[Use as Shared Printer]: If the computer on which you are currently installing the printer driver is to be used as a print server, select the [Use as Shared Printer] check box. Change [Shared Name] as needed.
11-B-3. If you have selected the [Use as Shared Printer] check box, perform the following procedure.
| For LBP3310 | For LBP5100/5000/3300 |
If you are using Windows Vista (64-bit), and if there are any computers on which Windows 2000/XP/Server 2003/Vista (32-bit) runs on the network, click [Drivers to Add]. Next, select [Windows 2000/XP/Server 2003 (x86)/Vista (x86)] (1), then click [OK] (2).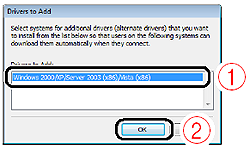 | If you are using an operating system other than Windows Vista, and if there are any computers on which Windows 98/Me runs on the network, click [Drivers to Add]. Next, select [Windows 98/Millennium Edition] (1), then click [OK] (2).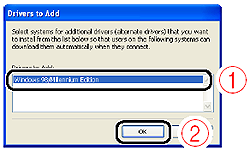 |
11-B-4. Click [Next].
If the following screen appears, click [Yes].
The following port is created.
| Printer | Operating System | Port to Be Created |
| LBP3310 | Windows 2000/XP/Server 2003/Vista | Standard TCP/IP Port |
| LBP5100 | Windows 2000/XP/Server 2003/Vista | |
| Windows 98/Me | Canon CAPT Port | |
| LBP5000/3300 | Windows 98/Me/2000/XP/Server 2003/Vista |
11-B-5. Proceed to Step 12.
12. Click [Start].
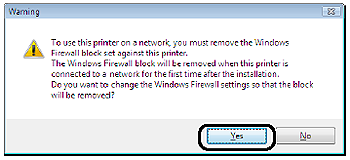
If the following screen appears, specify whether to configure Windows Firewall to unblock communication with the client computers when sharing the printer on a network.

If you want to share the printer on the network: Click [Yes]. After completing the installation, see "User's Guide" in the CD-ROM supplied with the printer and specify the settings for sharing the printer on the network.
If you do not want to share the printer on the network: Click [No].
Caution
13. If you are using Windows Vista, the following screen appears. Click [Yes].
Select [No] only if you do not use a LAN cable to connect the printer to a computer on which the printer driver is being installed.
14. Click [Yes].
Installation of the printer driver starts.
If [Easy Installation] was selected in Step 5, the manuals are also installed at a time.
Caution
15. Confirm the installation results, then click [Next].
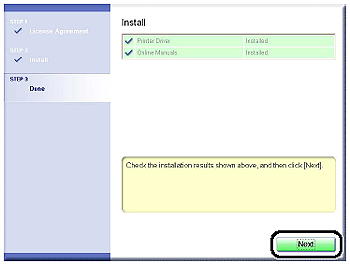
Caution
If the printer driver is not installed properly, see "Chapter 4 Troubleshooting" in Network Guide in the CD-ROM supplied with the printer.
16. Select the [Restart Computer Now (Recommended)] check box (1), then click [Restart] (2).
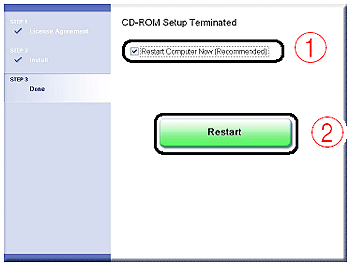
Windows restarts.
The installation of the printer driver is completed.
You can take the CD-ROM out of the CD-ROM drive after the installation is completed.
See "After Completing Installation" in "Chapter 2 Setting Up the Network Environment for Printing" in Network Guide in the CD-ROM supplied with the printer and make sure that the printer driver is installed properly.
For details on the network settings, such as the settings for DNS and WINS, see "Protocol Settings for the Printer" in "Chapter 2 Setting Up the Network Environment for Printing" in Network Guide in the CD-ROM supplied with the printer.