

Solution
Perform one of the following solutions according to the cause.
⋖Cause 1⋗
The printer is not turned ON.
⋖Solution⋗
Turn the printer ON.
⋖Cause 2⋗
The USB cable is not connected properly.
⋖Solution⋗
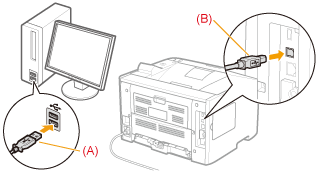
Make sure that the printer and computer are properly connected with the USB cable.
1. Make sure that the printer and computer are OFF.
2. Connect the USB cable.
⋖Cause 3⋗
The USB cable was already connected and the printer was turned ON before the printer driver was installed.
⋖Solution⋗
Perform the following procedure.
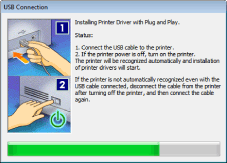
1. Turn the printer OFF.
2. Disconnect the USB cable.
3. Connect the USB cable again.
4. While the following screen appears, turn the printer ON.
⋖Cause 4⋗
An inappropriate USB cable is being used.
⋖Solution⋗
Use a USB cable that is appropriate for the USB interface environment of the printer and has the following symbol.

* The following is the USB interface environment of this printer.
⋖Cause 5⋗
The USB class driver is installed.
⋖Solution⋗
Uninstall the USB class driver using the following procedure.
1. Confirm whether the computer and printer are correctly connected by a USB cable, and whether the printer is switched on.
2. Click [ 
If you are using Windows 7, on the [
If the [User Account Control] dialog box is displayed, perform the following operation.
If you have logged on using an administrator account, click [Continue].
If you have logged on as a user, enter the administrator account password and click [OK].

2-A-1. From the [Start] menu, select [Settings] - [Control Panel], and double-click the [System] icon.
2-A-2. In the [System Properties] dialog box, click the [Hardware] tab → click [Device Manager].
2-B-1. From the [Start] menu, select [Control Panel] (- [Performance and Maintenance]), and double-click the [System] icon.
2-B-2. In the [System Properties] dialog box, click the [Hardware] tab → click [Device Manager].
3. Delete the USB class drivers displayed under [Universal Serial Bus controllers].
Make sure you do not delete items other than USB class drivers. If you delete something else by mistake, Windows may no longer operate correctly.
If USB class drivers are displayed under [Other Devices], they have not been installed correctly. Select the USB class drivers and delete them according to the operating system you are using.
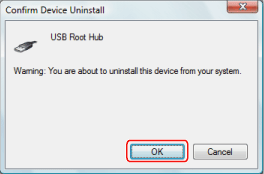
4. If the [Confirm Device Uninstall] (in Windows 2000/Windows XP/Windows Server 2003, [Confirm Device Removal]) dialog box is displayed, click [OK].
5. Close [Device Manager].
6. Close [Control Panel].
7. Remove the USB cable from the computer and restart Windows.
8. Uninstall the driver, and then install the USB class driver. For details on the procedures for uninstalling the driver and then installing the USB class driver, see "Printer Driver Installation Guide."
If you cannot correctly finish installing the driver, be sure to uninstall the driver before attempting to re-install it.