


Solution
The environment necessary for the wireless connection1. Prepare for the "Cableless setup"
2. Install the Software (Windows)
2. Install the Software (Mac OS X)
The environment necessary for the wireless connection
Before connecting this printer to the network, confirm the following two items, (A) and (B).
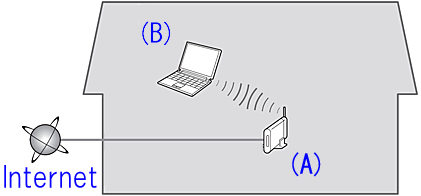
(A) Access point or router (supporting IEEE802.11b/g/n)
An access point or router is a relay device which connects not only the Internet and network devices such as a computer or printer, but also one network device to another.
So, your access point or router must be properly set before you go to the next setup step.
(B) The computer to be used with the printer must be connected to the network.
In order to confirm whether the computer to be used with the printer is connected to the network, try to browse the Internet website from the computer.
Caution
- If you do not know how to set up the router / access point or the Internet, please refer to:
1. Prepare for the "Cableless setup"
Before Starting Wireless Connection Setup
Caution
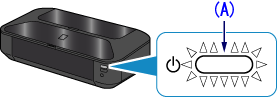
Make sure that the printer is turned on.
If the power is on, the (white) POWER lamp (A) will be lit.
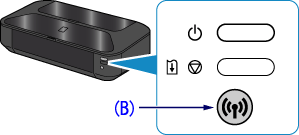
1. Hold down the Wi-Fi button (B) on the printer until the (white) POWER lamp flashes 2 times, then release the Wi-Fi button after the second flash.
2. Make sure that the (blue) Wi-Fi lamp flashes quickly and the (white) POWER lamp is lit.
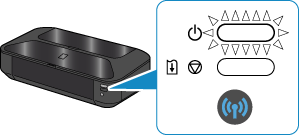
Now, the printer is ready for wireless LAN connection in the "Cableless setup" method.
The printer is not yet connected to an access point. To complete the connection, you need to install the software.
Install the software.
2. Install the Software (Windows)
Caution
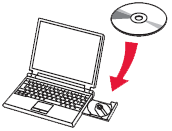
1. Insert the CD-ROM into the computer.
Caution
If your computer does not have the CD-ROM drive or you do not have the Setup CD, follow the steps given below.
The setup will start automatically. Go to Step 3 and follow the instructions.
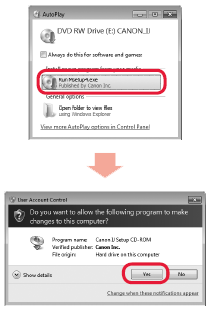
2. Click [ Run Msetup4.exe ] on the AutoPlay screen, then click [ Yes ] or [ Continue ] on the User Account Control dialog box.
If the User Account Control dialog box reappears in following steps, click [ Yes ] or [ Continue ].
Caution
If the CD-ROM does not autorun:
Double-click [ (My) Computer ] ⋗ CDROM icon ⋗ [ MSETUP4.EXE. ]
3. Click [ Next ].

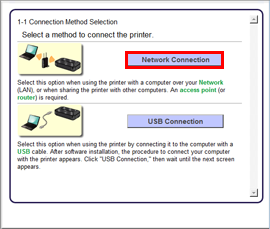
4. Click [ Network Connection ].
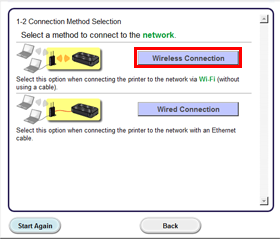
5. Click [ Wireless Connection ].
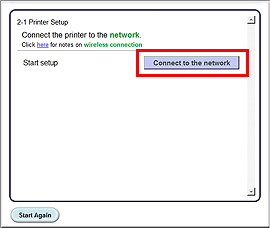
6. Click [ Connect to the network ].
7. Click [ Cableless setup ].

Caution
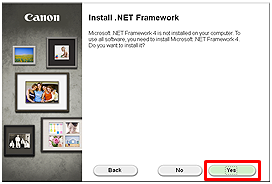
When the .NET Framework screen appears, click [Yes].
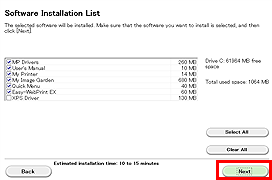
8. Click [ Next ].
Caution
Easy-WebPrint EX is Web print software that is installed on the computer when installing the supplied software. Internet Explorer 7 or later (Windows) is required to use this software. An Internet connection is required for installation.
Follow any on-screen instructions to proceed with the software installation.
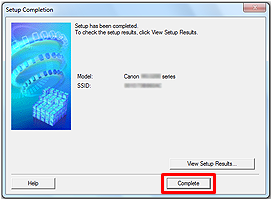
9. When the Setup Completion dialog box appears, click [ Complete ].
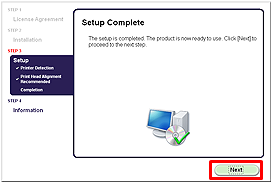
10. Click [ Next ].
- Important Information for the installation
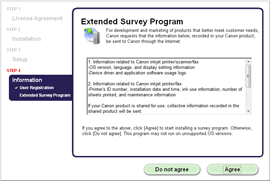
If you can agree to Extended Survey Program, click [ Agree ].
If you click [ Do not agree ], the Extended Survey Program will not be installed.
(This has no effect on the machine's functionality.)
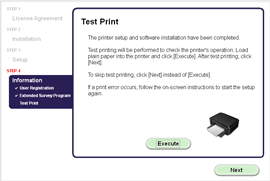
Test printing will be performed to check the printer's operation.
Load plain paper into the printer and click [ Execute ].
After test printing, click [ Next ].
To skip test printing, click [ Next ] instead of [ Execute ].
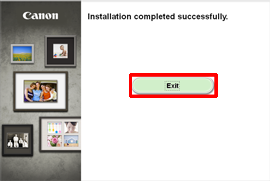
11. Click [ Exit ] to complete the installation.
Remove the Setup CD-ROM and keep it in a safe place.
12. Quick Menu starts.
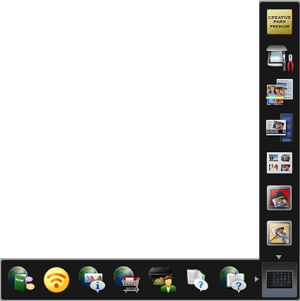
The wireless LAN connection of your printer to the access point in the "Cableless setup" method is completed.
2. Install the Software (Mac OS X)
Caution
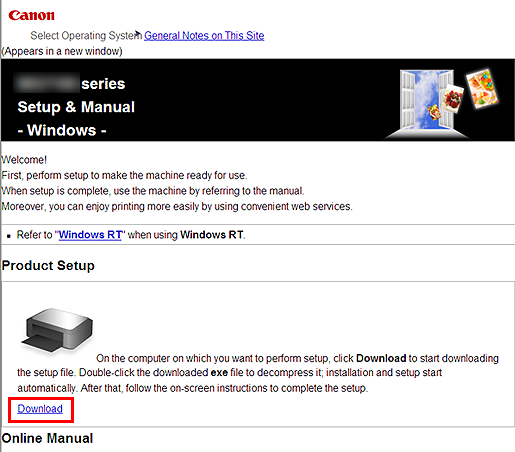
1. Visit http://canon.com/ijsetup/.
2. Select your region, printer name, and computer OS.
3. In the Product Setup section, click [ Download ]. The setup file will be downloaded.

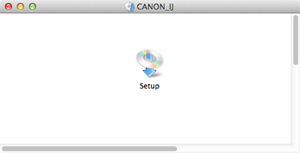
4. Double-click the downloaded .dmg file.
5. Double-click the [ Setup ] icon.
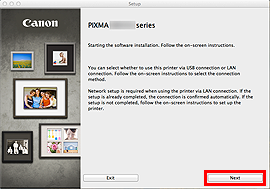
6. Click [ Next ].
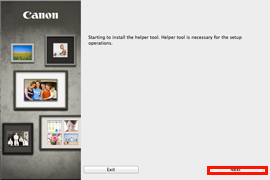
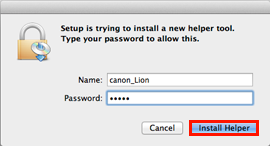
7. In the subsequent screen, enter the administrator name and password. Then click [ Install Helper ].
8. Click [ Next ].
9. Click [ Network Connection ].
10. Click [ Wireless Connection ].
11. Click [ Connect to the network ].
12. Click [ Cableless setup ].
13. Click [ Next ].
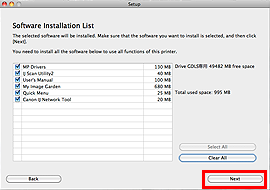
Follow any on-screen instructions to proceed with the software installation.
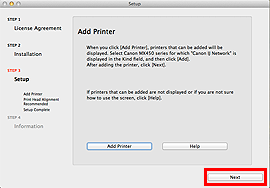
14. Click [ Add Printer ].
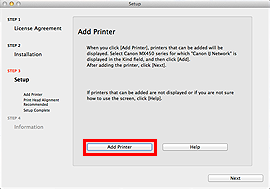
Caution
- The machine is turned on.
- The firewall function of any security software is turned off.
- The computer is connected to the access point.
15. Select [ Canon xxx series Canon IJ Network ] and click [ Add ].

Caution
If you will be installing the Canon printer driver on Mac OS X and using the printer through a network connection, you can select [ Bonjour ] or [ Canon IJ Network ] in the [Add Printer] dialog.
If [ Bonjour ] is selected, remaining ink level messages may differ from those indicated by [ Canon IJ Network ].
Canon recommends you to use [Canon IJ Network] for printing.
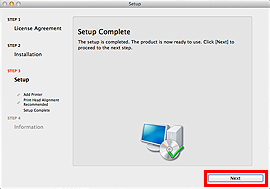
16. Click [ Next ].
17. Click [ Next ].
- Important Information for the installation
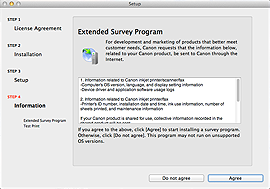
If you can agree to Extended Survey Program, click [ Agree ].
If you click [ Do not agree ], the Extended Survey Program will not be installed.
(This has no effect on the machine's functionality.)
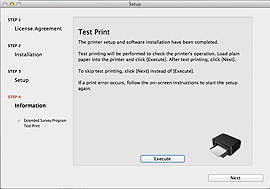
Test printing will be performed to check the printer's operation.
Load plain paper into the printer and click [ Execute ].
After test printing, click [ Next ].
To skip test printing, click [ Next ] instead of [ Execute ].
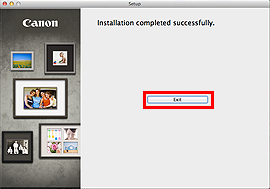
18. Click [ Exit ] to complete the installation.
Remove the Setup CD-ROM and keep it in a safe place.
19. Quick Menu starts.
The wireless LAN connection of your printer to the access point in the "Cableless setup" method is completed.