Solution
In [  ] mode, the camera automatically zooms in and out to keep a detected face at a constant size on the screen. If the person moves closer, the camera automatically zooms out, and vice versa. This size can also be adjusted, as needed.
Please use the procedure explained below to make adjustments.
Caution
The position and shape of the operation buttons, screens displayed, and setting items may differ according to the model you use.
The following section explains the setting procedures when the camera’s shooting mode has been set to [

].
Depending on the [Shooting Mode], setting [Auto Zoom] may not be possible. The shooting modes in which [Auto Zoom] cannot be set are listed below:
-[Fireworks] ( ), [Fish-eye Effect] (
 ), [Miniature Effect] (
 )
)
1. Press the ⋖Power⋗ button to turn the camera on.
2. Press the ⋖MENU⋗ button.
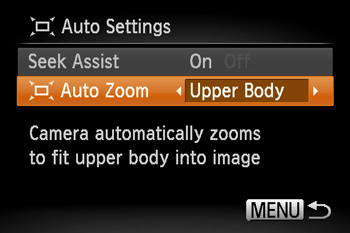
4. To adjust the Constant Face Display Size, refer to the table shown below and select the desired option by pressing the [  ], [
], [  ] buttons.
([Upper Body] has been selected in the example image below.)
| Face | Keep faces large enough to show facial expressions clearly. |
| Upper Body | Keep faces small enough to show the person’s upper body. |
| Whole Body | Keep faces small enough to show the person’s entire body. |
| Manual | Keep faces at the size specified by moving the zoom lever. Release the zoom lever once the desired size has been obtained. |
5. Press the ⋖MENU⋗ button to set the camera to shooting mode.
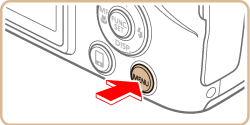
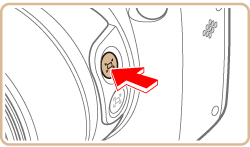
6. Press and release the [ ] button quickly.
[ Auto: On] is displayed.
Caution
Pressing and holding the [ ] button will set the camera to (Framing Assist – Seek) mode.
7. Choose the face.
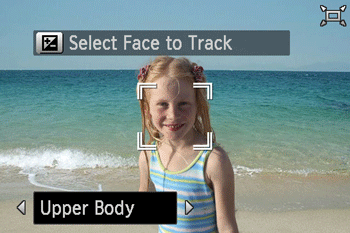
[

] is displayed once a face has been detected.
If multiple faces are detected, press the [

] button to switch to the face to keep at a constant size.
The camera zooms in and out to keep the face framed by [
] at a constant size on the screen.
Caution
8. Shoot.
Even after you shoot, [
] remains around the face displayed at a constant size.
To cancel constant face display size, press the [
] button again. [
Auto: Off] is displayed.
Caution
A face may not be displayed at a constant size at some zoom factors, or if the subject’s head is tilted or facing the camera indirectly.
During movie recording, a changed zoom factor and camera operating sounds are recorded.
When
Auto is on, some shooting information is not displayed, and some shooting settings cannot be configured.
Caution
If the person whose face is framed with [
] moves toward the edge of the screen, the camera zooms out to keep the person in view.
In step 8, switching [
] to another face with the [
] button is not possible during movie recording.
The zoom factor cannot be changed with the shutter button after you press the shutter button all the way down in self-timer mode.
The face size can also be adjusted in MENU -⋗ [

] tab -⋗ [
Auto Settings] -⋗ [
Auto Zoom]. You can choose [Off] to deactivate this feature
You can zoom in or out with the zoom lever when [Face], [Upper Body], or [Whole Body] is selected, but the original zoom factor will be restored in a few seconds after you release the lever.
You can clear your specified face size during movie recording by pressing the [
] button.
Face sizes cannot be changed during movie recording.