


Solution
Set Up: Install Camera Connect on a SmartphoneStep 1: Connect the Camera and Smartphone (Basic Setup)
Step 2-A: Connect the Camera and Smartphone (Connect via NFC)
Step 2-B: Connect the Camera and Smartphone (Connect Wirelessly)
Step 3: View and Save Images On the Smartphone
Operation Reference: Virtual Keyboard Operation
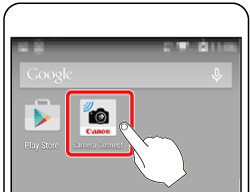
Set Up: Install Camera Connect on a Smartphone
To communicate with a smartphone, the dedicated smartphone application Camera Connect (free of charge) is necessary.
Caution
Step 1: Connect the Camera and Smartphone (Basic Setup)
1. Turn on the camera.
2. Select [Communication settings] under the [ 
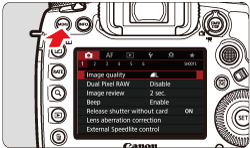
 ⋗ button and turn the ⋖
 ⋗ dial to select the [ ] tab.
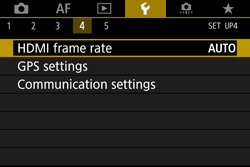
 ⋗ dial to select [Communication settings], and press ⋖
  ⋗.
⋗.
3. Select [Built-in wireless settings].
⋗ dial to select [Built-in wireless settings], and press ⋖ ⋗.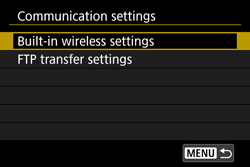
4. Select [Wi-Fi/NFC].
⋗ dial to select [Wi-Fi/NFC], then press ⋖ ⋗.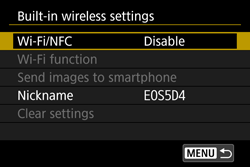
5. Select [Enable].
⋗ dial to select [Enable], then press ⋖ ⋗. ] to [Allow NFC connections].
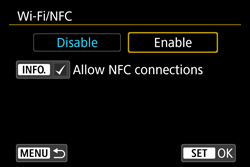
 mark are NFC-enabled. Some smartphones are not labeled with the mark even if they are NFC-enabled; if you do not know whether your smartphone is NFC-enabled, contact the manufacturer of the smartphone.
*For details on how to use the keyboard, refer to "Operation Reference: Virtual Keyboard Operation".
Caution
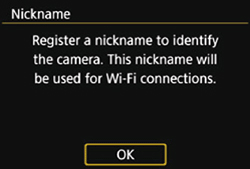
When this setting is selected for the first time, a screen to register a nickname (identification name) is displayed.
When the camera is connected to another device wirelessly, the nickname will be displayed on the device. Be sure to set a nickname as otherwise you cannot set the wireless functions.
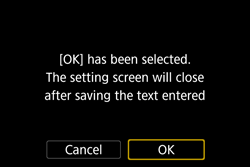
Select [OK] and enter a nickname. (You can enter between 1 to 10 characters.)

When you are finished, press the ⋖MENU⋗ button.
Select [OK] on the confirmation dialog and press ⋖
The basic setup is now complete. The steps after this differ depending on the connection method.
Step 2-A: Connect the Camera and Smartphone (Connect via NFC)
If your Camera Connect version is 2.7.10 or later, check the Android OS version of your smartphone. If the version is 10.0 or later, the camera firmware must be up to date to take advantage of NFC functionality. You can download the latest firmware from the Canon website.
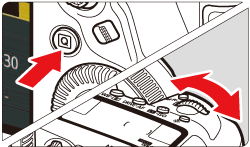
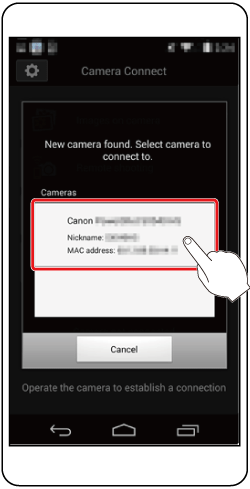
1. NFC-enabled smartphones can be connected by touching them to the camera.


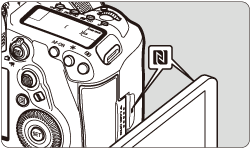
mark on the smartphone to that on the camera. ⋗ button to end the playback.
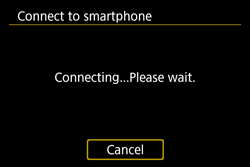
Camera Connect starts on the smartphone and establishes a connection.
When a message indicating the connection is being established is displayed on the camera’s LCD monitor, move the smartphone away from the camera.
When a connection is established, the screen below will appear on the camera's LCD monitor.*
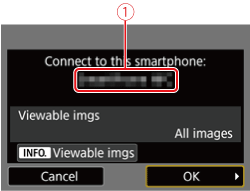

*When connecting to the same smartphone, this screen will not appear again.
2. Save the connection settings.
Press ⋖
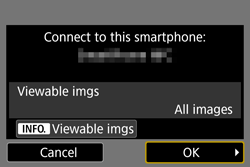
After a connection message is displayed, the [ 
After the camera operation is complete, the main window of Camera Connect will be displayed on the smartphone.
Caution
⋖NFC Function Cautions⋗
mark, then touch again. Caution
Step 2-B: Connect the Camera and Smartphone (Connect Wirelessly)
Caution
 are for smartphones. The operation instructions that begin with this illustration
  are for cameras.
] tab, select [Communication settings], then press ⋖ ⋗.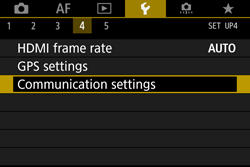
⋗ dial to select [Built-in wireless settings], then press ⋖ ⋗.
⋗ dial to select [Wi-Fi function], then press ⋖ ⋗.
⋗ dial to select [Enable], then press ⋖ ⋗.
⋗ dial to select [Wi-Fi function], then press ⋖ ⋗.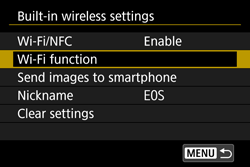

⋗ dial to select [ ], then press ⋖ ⋗.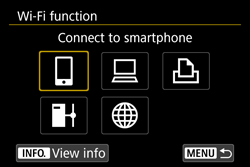
⋗ dial to select [Easy connection], then press ⋖ ⋗.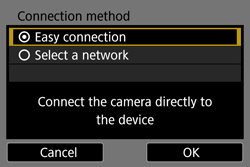
⋗ to go to the next screen.


Caution

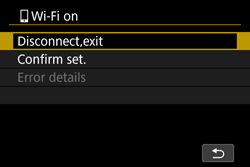
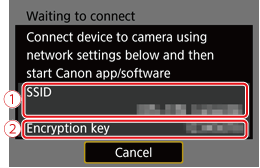
Wi-Fi on] screen will appear.After the camera operation is complete, the main window of Camera Connect will be displayed on the smartphone.
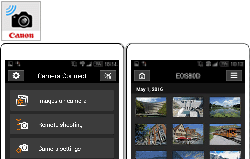
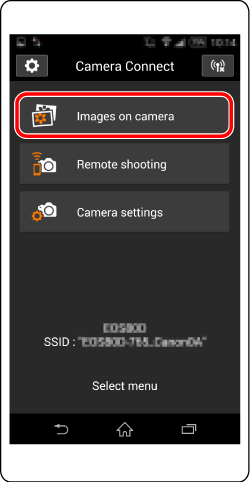
Step 3: View and Save Images On the Smartphone
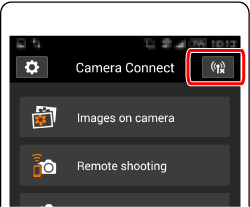
1. On the Camera Connect menu screen on the smartphone, choose [Images on camera].
2. Use your smartphone to save images from the camera to the smartphone.
When the camera and smartphone are connected, a list of images in the camera appears in "Camera Connect". Tap the [ 
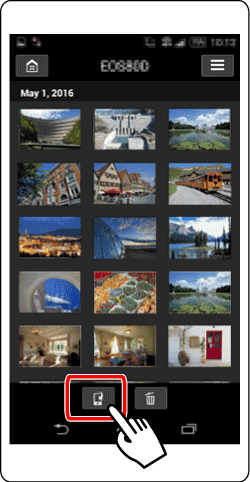
3. When the selection screen appears, select the images you wish to save (
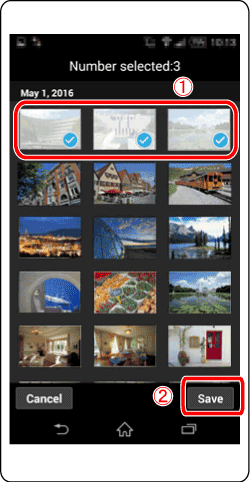
The selected images are saved to the smartphone.
4. When the images have been saved, tap the home button on the top left to return to the menu screen.
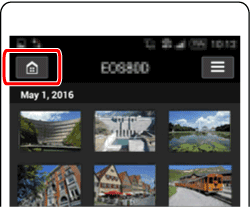
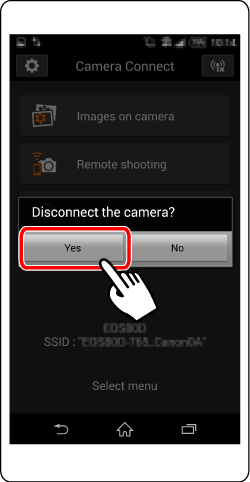
5. To end the connection, tap the [ 
Sending images to a smartphone via wireless LAN is now complete.
* Android™ and Google Play™ are trademarks of Google Inc.
Caution
Caution
 ], turn the mode dial, or open the card slot cover or battery compartment cover.
Operation Reference: Virtual Keyboard Operation
For details on keyboard operation when registering a nickname (identification name) of the camera, refer to the following.
You can change the nickname later on the [General sett.] screen.
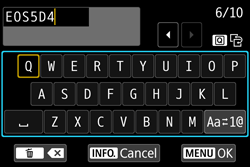
| Changing the entry area | Press the button to toggle between the top and bottom entry areas. |
| Moving the cursor | Press the or  keys in the top area to move the cursor. keys in the top area to move the cursor. |
| Entering text | In the bottom area, press the or keys to select a character, then press to enter it. You can check how many characters you have entered, and how many more can be entered, by referring to [*/*] on the upper right of the screen. |
| Changing the entry mode* | Select  at the bottom right of the bottom entry area. Each time you press the entry mode will change as follows: Lower case → Numerals/Symbols 1 → Numerals/Symbols 2 → Upper case. at the bottom right of the bottom entry area. Each time you press the entry mode will change as follows: Lower case → Numerals/Symbols 1 → Numerals/Symbols 2 → Upper case.*When [Touch control: Disable] is set, you can enter all characters on one screen. |
| Deleting a character | Press the  button to delete one character. button to delete one character. |
| Finishing the text entry | Press the < MENU > button to confirm what you have entered and exit. If a confirmation dialog is displayed, select [OK] to exit. |
| Canceling the text entry | Press the < INFO. > button to cancel text entry and exit. If a confirmation dialog is displayed, select [OK] to exit. |