

Printing Documents (Windows)
Caution
1. Make sure that the machine is turned on.
2. Load paper.
Here we make sure that A4 plain paper is loaded in the Cassette.
-⋗ [ Loading Paper ]
Caution
Load A4, B5, A5, or Letter-sized plain paper in the Cassette and other sizes or types of paper such as photo paper in the Rear Tray.
3. Open the Paper Output Tray gently, and open the Output Tray Extension.
4. Create (or open) a document to print using an appropriate software application.
5. Open the printer driver setup window.
(1) Select Print on the File menu or the command bar in your software application.
The Print dialog box will appear.
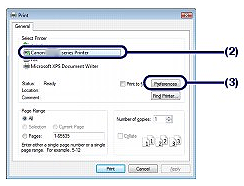
(2) Make sure that your machine's name is selected.
Caution
If another printer's name is selected, click and select your machine's name.
(3) Click Preferences (or Properties).
6. Specify the required print settings.
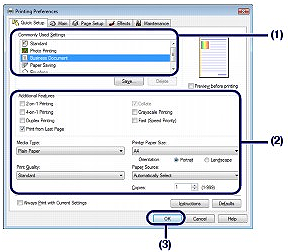
(1) Select Business Document in Commonly Used Settings.
Caution
(2) Make sure of the displayed settings.
Here we make sure that Plain Paper in Media Type, Standard in Print Quality, A4 in Printer Paper Size, and Automatically Select in Paper Source are selected.
Caution
However, after changing Printer Paper Size, confirm that the setting for Page Size on the Page Setup sheet matches the setting set in the software application.
If you select the wrong page size or media type, the machine may feed paper from the wrong paper source or may not print with the proper print quality.
(3) Click OK.
Caution
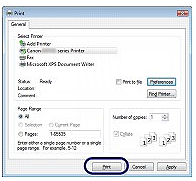
7. Start printing.
Click Print (or OK) to start printing.
Caution
To display the printer status monitor, click Canon XXX Printer (where "XXX" is your machine's name) on the taskbar.
See [ Aligning the Print Head ].
Printing Documents (Macintosh)
Caution
Operations may vary depending on your software application. For details on the operation, refer to the instruction manual of your application.
1. Make sure that the machine is turned on.
2. Load paper.
Here we make sure that A4 plain paper is loaded in the Cassette.
-⋗ [ Loading Paper ]
Caution
Load A4, B5, A5, or Letter-sized plain paper in the Cassette and other sizes or types of paper such as photo paper in the Rear Tray.
3. Open the Paper Output Tray gently, and open the Output Tray Extension.
4. Create (or open) a document to print using an appropriate software application.
5. Open the Print dialog box.
Select Print on the File menu in your software application.
The Print dialog box will appear.
Caution
If the dialog box below appears, click 
6. Specify the required print settings.
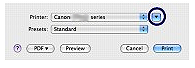
(1) Make sure that your machine's name is selected in Printer.
(2) Select the page size of the loaded paper in Paper Size.
Here we select A4.
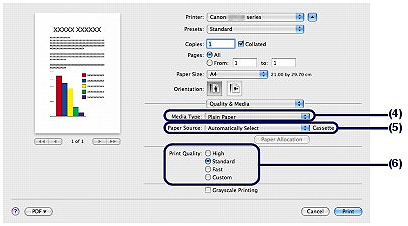
(3) Select Quality & Media in the pop-up menu.

(4) Select the media type of the paper to print in Media Type.
Here we select Plain Paper.
Caution
If you select A4, B5, A5, or Letter-sized plain paper when Automatically Select is selected in Paper Source, the machine feeds the paper from the Cassette. If you select other sizes or types of paper such as photo paper, the machine feeds the paper from the Rear Tray.
If you select the wrong page size or media type, the machine may feed paper from the wrong paper source or may not print with the proper print quality.
(5) Make sure that Automatically Select is selected in Paper Source.
(6) Select the print quality in Print Quality.
Here we select Standard.
Caution
 (Question) on the Quality & Media, Color Options, Borderless Printing, or Margin screen.
7. Start printing.
Click Print to start printing.
Caution
See [ Aligning the Print Head ].
Caution
The screens used in this section are for printing with Mac OS X v.10.4.x.
1. Make sure that the machine is turned on.
2. Load paper.
Here we make sure that A4 plain paper is loaded in the Cassette.
-⋗ [ Load paper ]
Caution
Load A4, B5, A5, or Letter-sized plain paper in the Cassette and other sizes or types of paper such as photo paper in the Rear Tray.
3. Open the Paper Output Tray gently, and open the Output Tray Extension.
4. Create (or open) a document to print using an appropriate software application.
5. Specify the page size.
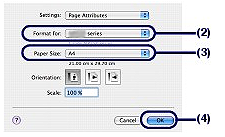
(1) Select Page Setup on the File menu in your software application.
The Page Setup dialog box will appear.
(2) Make sure that your machine's name is selected in Format for.
(3) Select the page size of the paper in Paper Size.
Here we select A4.
(4) Click OK.
6. Specify the required print settings.
(1) Select Print on the File menu in your software application.
The Print dialog box will appear.
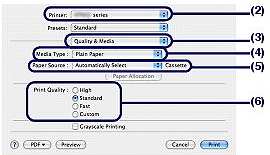
(2) Make sure that your machine's name is selected in Printer.
(3) Select Quality & Media in the pop-up menu.
(4) Select the media type of the loaded paper in Media Type.
Here we select Plain Paper.
Caution
If you select A4, B5, A5, or Letter-sized plain paper when Automatically Select is selected in Paper Source, the machine feeds the paper from the Cassette. If you select other sizes or types of paper such as photo paper, the machine feeds the paper from the Rear Tray.
If you select the wrong page size or media type, the machine may feed paper from the wrong paper source or may not print with the proper print quality.
(5) Make sure that Automatically Select is selected in Paper Source.
(6) Select the print quality in Print Quality.
Here we select Standard.
Caution
(Question) on the Quality & Media, Color Options, Special Effects, Borderless Printing, or Margin screen.7. Start printing.
Click Print to start printing.
Caution
See [ Aligning the Print Head ].