


Solution
Starting Browser RemoteBrowser Remote Onscreen Controls and Displays
The Main Remote Recording Screen: Detailed Camcorder Settings
Finished using Browser Remote
After connecting the camcorder to a Wi-Fi network, you can operate the camcorder remotely via Browser Remote, a Web browser application that can be accessed using the Web browser on network devices*. Using Browser Remote, you can check the camcorder's live view image and control various recording settings. On the Browser Remote screen, you can also check the remaining recording time on the SD card, remaining battery charge and the camcorder’s time code.
* For details about compatible devices, operating systems, Web browsers, etc., please visit your local Canon website.
Caution
Starting Browser Remote
After completing the network connection, you can start the Browser Remote application on the Web browser* of any network device** connected to the same network.
* A Web browser that supports JavaScript and is enabled to accept cookies is required.
**For details about compatible devices, operating systems, Web browsers, etc., please visit your local Canon website.
[Before using the network functions]
Caution

 only) or HDMI OUT terminal near the Wi-Fi antenna. Doing so may negatively affect the wireless communication over Wi-Fi.
Caution
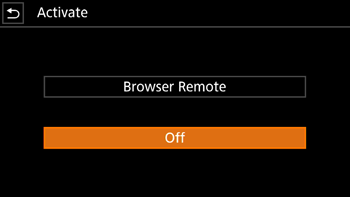
1. Using the Camera Access Point.
Caution
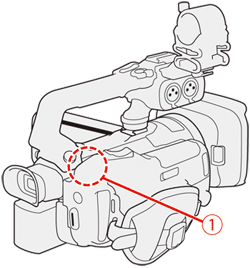
[Camera Access Point]
In this mode the camcorder itself serves as a wireless access point to which other Wi-Fi-enabled devices can connect. Initially, basic settings for a Camera Access Point connection (network name (SSID), password) are already saved under network configuration profile. You can use the default settings to connect immediately to the camcorder or follow the procedure below if you wish to change the settings.
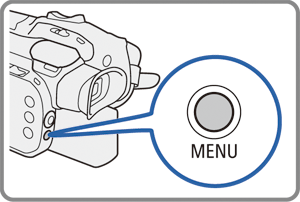
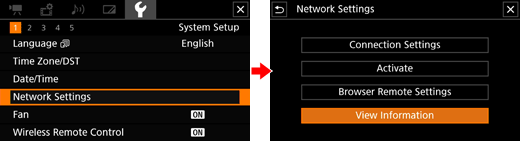
2. Press the [MENU] button.
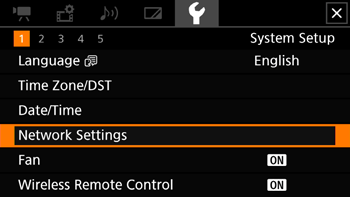
3. Touch [ 
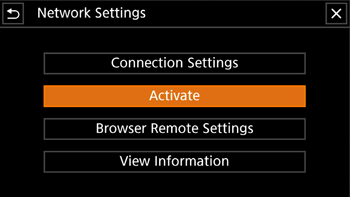
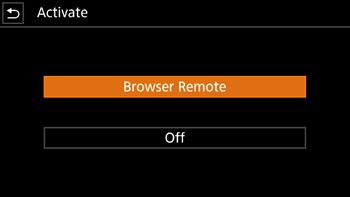
4. Touch [Activate].
5. Touch [Browser Remote].
6. Touch [ 
Caution
 will appear at the right of the screen. When the icons turn white, the camcorder is ready to accept commands from the Browser Remote application.
7. If necessary, display the camcorder's settings to complete the connection.
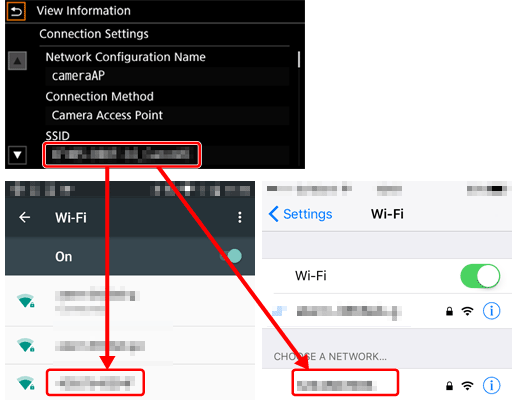
Touch [System Setup ] -⋗ [View Information].
 ] / [
] / [  ] to scroll up/down.
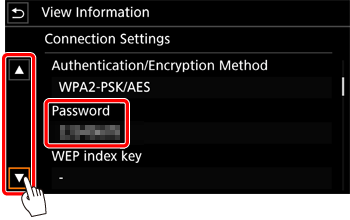
8. Touch 
Connect the Smartphone to the camcorder.
9. Activate Wi-Fi in the settings screen.
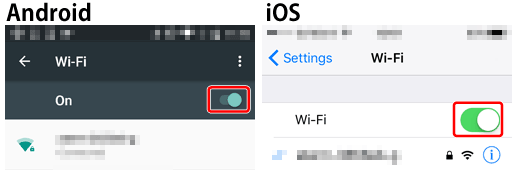
10. Touch the SSID (network name) that matches the one displayed on the camcorder's screen.
11. Enter the password displayed on the camcorder's screen to establish a connection.
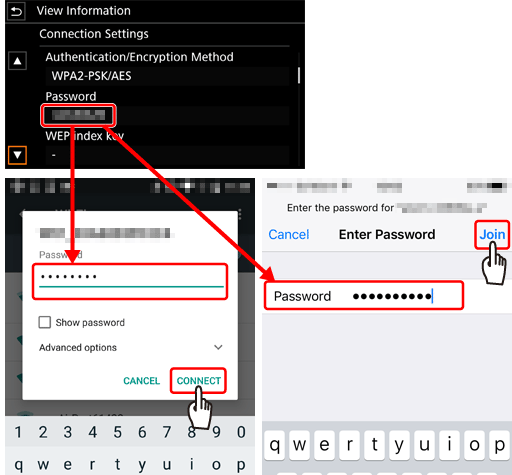
Caution
12. Start the Web browser on the Smartphone.
13. Enter the camcorder’s URL (
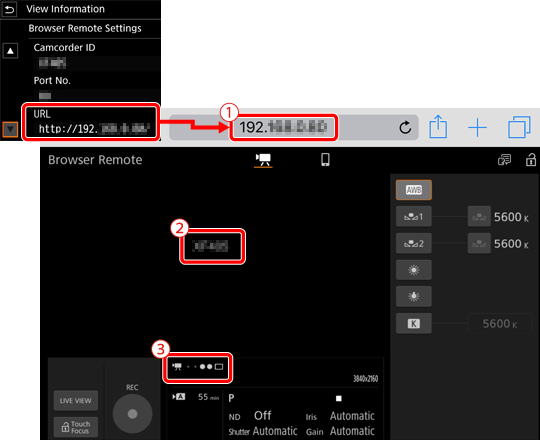
 (
( ) will keep turning on and off in a loop.
 ) was set, it will appear on the Browser Remote screen while live view is not activated.
14. Select the language for Browser Remote.
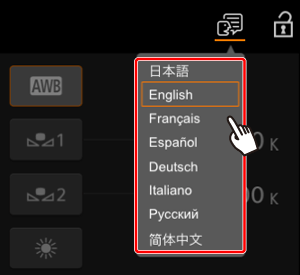
 and select the desired language from the list. The language selected applies mainly to the messages displayed in the application. The application's buttons are displayed in English only, regardless of the language selected.
Caution
Browser Remote Onscreen Controls and Displays
The Browser Remote application has 2 screens. The main screen, [ 

The following sections explain how to use the Browser Remote controls. For detailed information and applicable restrictions about the functions themselves, please refer to each function’s explanation.
Caution
]When using a computer, tablet and other devices with larger screens, this screen offers all the controls available for operating the camcorder remotely via Browser Remote.
| Live view screen* Shows the camcorder's live view image. When the live view image is not turned on, the camcorder ID will appear here. The camcorder's live view image will not be displayed when the camcorder is set to internal recording with a video configuration of 3840x2160 at 59.94P/50.00P, and [  Display Setup ] -> [HDMI Max Resolution] is set to [3840x2160]. Display Setup ] -> [HDMI Max Resolution] is set to [3840x2160]. |  | Language selection |
| Information about the recording* : Dual recording. : Dual recording.STBY  , REC : Recording command. , REC : Recording command. , ,  : Slow & fast motion recording. : Slow & fast motion recording. : Pre-recording. : Pre-recording.0000x0000: Resolution. |  | Key lock button Touch the icon to lock the Browser Remote screens in order to prevent settings from being changed inadvertently. |
| Connection indicator* While Browser Remote is correctly connected to the camcorder, the dots will keep turning on and off in a loop. |  | SD cards and approximate remaining recording time* The currently selected SD card is indicated with a  mark next to the icon. mark next to the icon.Remaining recording times are approximate and calculated based on the current video configuration used. |
 | [LIVE VIEW] button Touch the button to display the camcorder's live view image on the Browser Remote screen. |  | [SLOT SELECT] button Touch the button to select the other SD card when both SD card slots contain a card. |
 | [  Touch Focus] button Touch Focus] buttonTouch the button to unlock (enable) the touch focus mode. |  | Shooting mode / Infrared recording / AUTO mode When infrared recording is activated or the camcorder is set to mode, the shooting mode cannot be selected. |
 | [REC] button Touch the button to start recording. While recording, the center of the button turns red. Touch the button again to stop recording. |  | Current camcorder settings This panel displays an overview of the camcorder settings currently used. You can change these settings with the controls in the detailed camcorder settings panel (16) on the right. [ND] : ND filter [WB] : White balance [Shutter] : Shutter speed [Iris] : Aperture value [  ] : Exposure compensation ] : Exposure compensation [Gain] : Gain value |
 | Browser Remote screen selection Touch [ ] to open the main remote recording screen or [ ] to open the basic screen for devices with a small screen. |  | Time code and recording operation (same as on the camcorder) |
 | Remaining battery charge* |  | Detailed camcorder settings panel Touch one of the tabs at the bottom to select the camcorder settings you wish to adjust: [White Balance] : White balance mode and related settings. [Exposure] : Exposure related settings - aperture, shutter speed and gain. [Focus/Zoom] : Focus related settings and zoom operations. |
| * Onscreen display/indication only. The content or value cannot be changed using Browser Remote. | |||
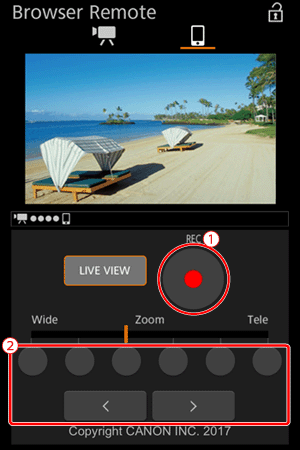
]When using a smartphone or other device with a smaller screen, this screen offers only a small live image screen for final confirmation, zoom controls (
Caution
] icon at the top of the Browser Remote screen.The Main Remote Recording Screen: Detailed Camcorder Settings
The following sections explain how to use the controls in the detailed camcorder settings panel. For detailed information and applicable restrictions about the functions themselves, please refer to each function's explanation.
Touch the [White Balance] tab in the detailed camcorder settings panel.
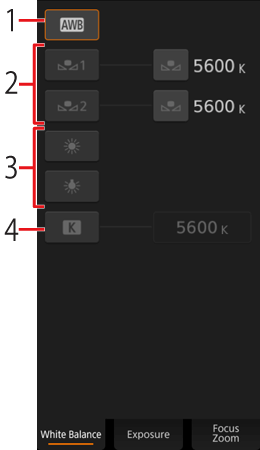
1. Automatic white balance button
Touch [ 
2. Custom white balance buttons
Touch [ 

Caution
To register a custom white balance: Point the camcorder at a gray card or white object with no pattern so it fills the center of the live view screen and touch [ 
3. Preset white balance settings
Touch [ 

4 Color temperature setting
Touch [ 

Touch the [Exposure] tab in the detailed camcorder settings panel.
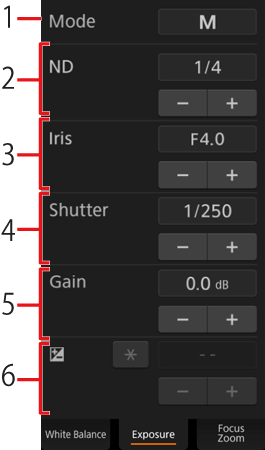
1. [Mode] (shooting mode) button
Touch the button, touch the icon of the desired shooting mode and then touch [
2. ND Filter buttons
].3 Aperture related buttons
].4. Shutter speed related buttons
].5. Gain related buttons
].6. Exposure adjustment buttons
Touch [–] or [+] to compensate the exposure. You can also touch the current exposure compensation value, select the desired value from the list (or touch [–] / [+]) and then touch [
If necessary, touch [ 
Touch the [Focus | Zoom] tab in the detailed camcorder settings panel.
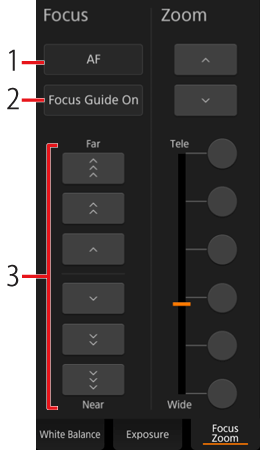
1. Focus mode button
2. [Focus Guide] (Dual Pixel Focus Guide function) button
3. Manual focus buttons
1. Touch the focus mode button, touch [MF] and then touch [
Caution
2. Touch one of the manual focus buttons on the [Near] side to focus closer or one of the buttons on the [Far] side to focus farther away. There are three levels of adjustment - [ 


1. In manual focus mode, touch the [Focus Guide Off] button.
2. Touch [On] to display the focus guide and then touch [
In autofocus mode, you can touch on a subject that appears in the Browser Remote’s live view screen in order to select it for focusing.
1. Make sure the touch focus function has been unlocked and the
2 Touch the desired subject in the live view screen.
Touch the [Focus | Zoom] tab in the detailed camcorder settings panel.

1. Touch one of the fixed zoom position buttons on the [Tele] side to zoom in or one of the buttons on the [Wide] side to zoom out.
Caution
] / [ ].Caution
Finished using Browser Remote
When you have finished using Browser Remote, turn it off on the camcorder.
1. Press the [MENU] button.
2. Touch [
3. Touch [Activate].
4. Touch [Off].
5. Touch
Caution