

Solution
1. Holding the Camera2. When the Camera Shake Icon Appears
3. Image is blurred
4. The AF frame does not appear, and the camera does not focus
5. Information on different models
When an image is blurry or cannot be brought into focus during shooting, please check the following.
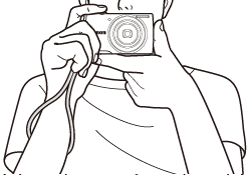
1. Holding the Camera
You can prevent camera shake by holding the camera firmly.
Keep your arms tight against your body while holding the camera firmly by the sides. Be sure that your fingers do not block the ⋖flash⋗.
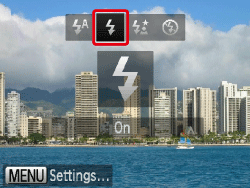
2. When the Camera Shake Icon Appears
When you press the ⋖Shutter Button⋗ halfway in low light conditions where camera shake is likely, a flashing (
Press ⋖

 ).
).Press the ⋖
Press the ⋖FUNC./SET⋗ (


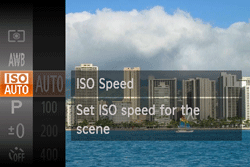
For details on the setting screen that appears on your camera or the [Shooting Modes] in which the [ISO Speed] can be set, see the table at the end of the page.
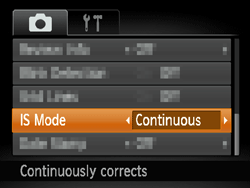
Additionally, you should set the [IS Mode] to [Off] when shooting with a tripod.
3. Image is blurred
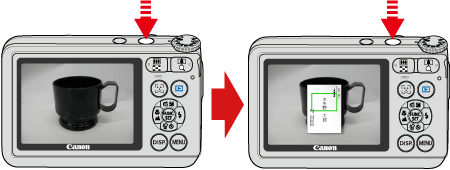
Half-press the ⋖Shutter Button⋗ (press lightly to focus), and then press it fully (without releasing the ⋖Shutter Button⋗, press it all the way down).

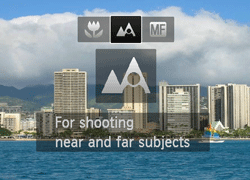
For details on the shooting distances for the [Focusing Range] of your camera, please see the table at the end of the page.
Press the ⋖

Press the ⋖Macro⋗ (
- Focus Lock
Change the composition while holding the ⋖Shutter Button⋗ down halfway.

- AF Lock
With the ⋖Shutter Button⋗ pressed halfway, press the ⋖
The focus is fixed and (

4. The AF frame does not appear, and the camera does not focus
If you center on the light and dark contrasting area of the subject and push the ⋖Shutter Button⋗ halfway, or repeatedly push the ⋖Shutter Button⋗ halfway, the [AF frame] will appear and the camera will focus.
Caution
The camera may not be able to focus in some conditions.
5. Information on different models
 ...The ISO speed can be set.
 ... Shooting modes in which ISO speed cannot be set.
| Model | Shooting modes in which the ISO speed setting can be made | |
|---|---|---|
 |  | |
| PowerShot ELPH 330 HS / IXUS 255 HS | | |
| PowerShot ELPH 130 IS / IXUS 140 PowerShot ELPH 120 IS / IXUS 135 PowerShot ELPH 115 IS / IXUS 132 | | |
| PowerShot A3500 IS | | |
| Model | Focusing zone |
|---|---|
Figures in the upper line: [Normal] ( ) )Figures in the bottom line : [Macro] ( ) | |
| PowerShot ELPH 330 HS / IXUS 255 HS | [Normal] 5 cm (2.0 in.) – infinity (W) / 1 m (3.3 ft.) – infinity (T) [Macro] 1 cm (0.4 in.) – 50 cm (1.6 ft.) (W) |
| PowerShot ELPH 130 IS / IXUS 140 PowerShot ELPH 120 IS / IXUS 135 PowerShot ELPH 115 IS / IXUS 132 | [Normal] 5 cm (2.0 in.) – infinity (W) / 1.3 m (4.3 ft.) – infinity (T) [Macro] 1 cm (0.4 in.) – 50 cm (1.6 ft.) (W) |
| PowerShot A3500 IS | [Normal] 5 cm (2.0 in.) – infinity (W) / 1.2 m (3.9 ft.) – infinity (T) [Macro] 3 cm (1.2 in.) – 50 cm (1.6 ft.) (W) |
* (W): When turning the zoom lever toward (
** (T): When turning the zoom lever toward (