Canon Group
Close Close
Menu Menu Close Close Search
EOS 40D Support
FAQ and troubleshooting

Compositing Images in Digital Photo Professional Ver.4.x

Content Id: 8203070700


Solution

You can combine two images into a single image. You can further combine images by adding another image to the composited image. Since the composited image is saved as a separate image, the original images remain as they are.

Caution

On 32-bit Windows OSs, this function is not available.

Caution

This function can be used with all image types supported by Digital Photo Professional.
The color space of a composited image will be the color space of the background image.
Image information is not appended to a composited image.

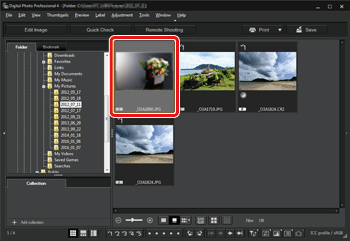
1. Select a background image in the main window.

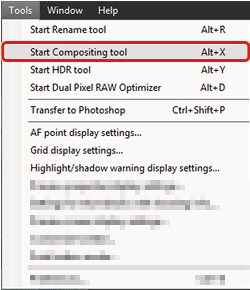
2. Select the [Tools] menu -⋗ [Start Compositing tool].

The compositing tool window appears.

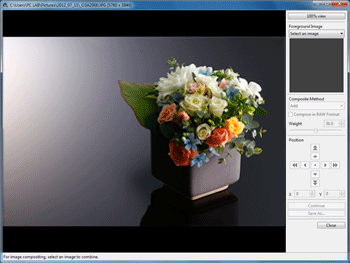
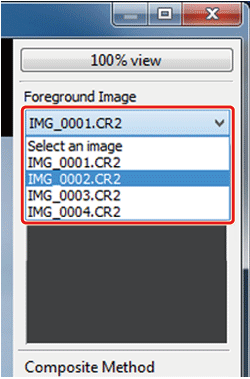
3. Select the image to combine.

Select the image to combine from the [Foreground Image] list box.
The selected image is displayed in the [Foreground Image] thumbnail display.
A preview of the combined background image and [Foreground Image] is displayed in the composite preview.

Caution

The following images can be combined.

- When a background image is selected in the main window: images in same folder as background image

- When a background image is selected in the [Collection] window: images in the [Collection] window

- When a background image is selected in the edit image window: images displayed in the thumbnail display area

- You can also combine images of different sizes.

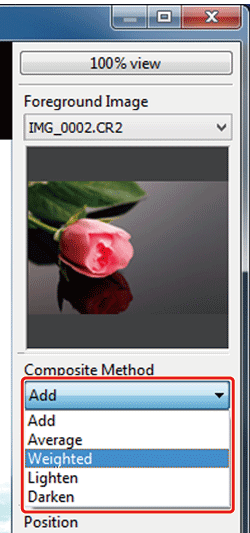
4. Select a compositing method.

Select a compositing method from the [Composite Method] list box.
The compositing method selected in the composite preview is applied.

Caution

If you select [Weighted], you can set the proportion of the image to be combined. Use the [Weight] slider at the bottom of the [Composite Method] list box or directly enter a value to set the proportion.
By clicking the [100% view], the image is displayed at 100% magnification (actual pixel size).

⋖Compositing Methods⋗

Composite MethodContents
AddThe background image and [Foreground Image] are added and images are combined.
AverageThe background image and the [Foreground Image] are combined in proportions of 50% each.
If you want to change the proportion of the [Foreground Image], select [Weighted].
WeightedSet the proportion of the [Foreground Image] and then combine the background image and [Foreground Image].
LightenThe background image and the [Foreground Image] are compared, with only brighter portions of the [Foreground Image] being combined.
DarkenThe background image and the [Foreground Image] are compared, with only darker portions of the [Foreground Image] being combined.

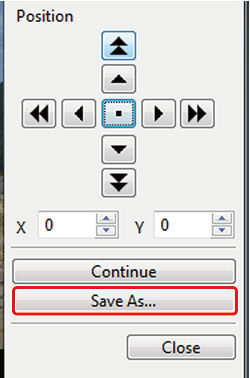
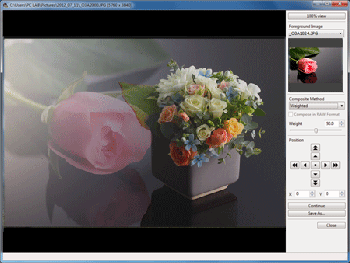
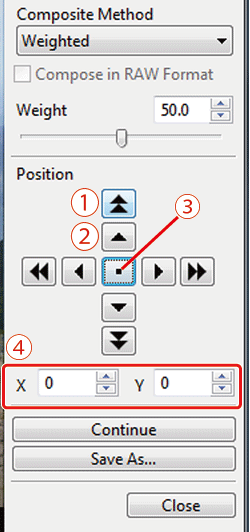
5. Position the images.

By default, the background image and the [Foreground Image] are displayed with their centers aligned.

[Compose in RAW Format] : Checkmark the [Compose in RAW Format] checkbox as necessary.

Shift large amount (50 pixels)

Shift small amount (1 pixel)

Align image centers

You can also directly enter the position coordinates of the [Foreground Image] to align it.

Caution

1. You can set [Compose in RAW Format] under the following conditions. Both the background image and [Foreground Image] are RAW images, and all the following conditions are met.

The cameras used to shoot were of the same model
The ISO speed setting at the time of shooting was the same
The highlight tone priority setting at the time of shooting was the same
The image sizes (original size) are the same

2. The following functions are not available for images composited with [Compose in RAW Format].

Auto Lighting Optimizer
Picture Style Auto (automatically set to Standard)

6. Click the [Save As].

Specify the required settings in the window that appears and then click the [Save].
By clicking the [Continue], images are combined to create a new background image, and you can continue by combining another image.
To finish, click the [Close].
"Was this helpful?"