

Solution
Preparing for Receiving a FaxReceiving a Fax
Receiving a Fax Temporarily in the Memory of the Machine (Memory Receiving)
Printing Documents in the Memory
This section describes the operation to receive a fax with the machine depending on the receive mode. This section also describes the operation to print documents stored in the memory of the machine such as when ink or paper runs out.
Preparing for Receiving a Fax
Prepare for receiving a fax according to the following procedure.
1. Make sure that the power is turned on.
2. Make sure of the receive mode setting.
(1) Press the FAX button.
(2) Confirm the receive mode.

3. Load paper.
See Loading Paper .
Here we make sure that the plain paper is loaded in the Rear Tray.
4. Specify the paper settings as necessary.
(1) Press the Settings button.
The Page size screen will appear.

(2) Use the 

You can specify A4, 8.5"x11"(LTR), or Legal (or 8.5"x14").
(3) Confirm that Plain paper is selected for Media type, and press the OK button.
Caution
If a media type other than Plain paper is selected, select Plain paper.

Caution
The paper settings are shared among the copy mode, fax mode, and template print. After printing in other modes, confirm or change the paper settings.
If page size other than A4, 8.5"x11" (LTR), or Legal (or 8.5"x14"), or a media type other than Plain paper is selected, faxes or reports cannot be printed.
See Receiving a Fax Temporarily in the Memory of the Machine (Memory Receiving).
Receiving a Fax
Depending on the selected receive mode, the receive operation varies.
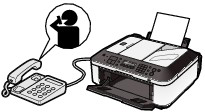
When the call is a fax:
The telephone will ring when a call incomes.


(1) Pick up the handset. If you hear the fax tone, wait for at least 5 seconds after it stops, then hang up the handset.
The machine will receive the fax.


Caution
- The telephone has no answering function.
- If the telephone has an answering function, it is deactivated.
Other options
When the call is a voice call:
The telephone will ring when a call incomes.

(1) Pick up the handset, and talk on the telephone.
Caution
When the answering machine is connected to the machine
- The entire message should be no longer than 15 seconds.
- In the message, tell your callers how to send a fax.
After making this setting, we recommend that you confirm that messages are recorded successfully in the answering machine.
When the call is a fax:
The telephone will ring when a call incomes.
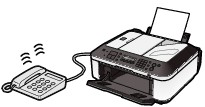
The machine will receive the fax automatically.
Caution
Other options
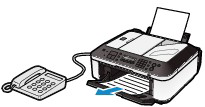
When the call is a voice call:
The telephone will ring when a call incomes.

When the machine detects a voice call, the machine will ring.
(1) Pick up the handset, and press the Stop button to talk on the telephone.
Caution
When the machine rings, pick up the handset before pressing the Stop button. If the Stop button is pressed before picking up the handset, the telephone call will be disconnected.
Caution
Other options
When the call is a fax.
The machine will receive the fax automatically.

Caution
If a telephone is connected to the machine, the telephone will ring when a call incomes.
When the call is a fax:
The telephone will ring when a call incomes.

The machine will receive the fax automatically when the fax ring pattern is detected.

Caution
Other options
Change the number of times to ring the telephone.
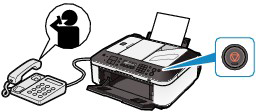
When the call is a voice call:
The telephone will ring when a call incomes.

When the machine does not detect the fax ring pattern, the telephone will continue ringing.
(1) Pick up the handset, and talk on the telephone.

Caution
Contact your telephone company for details.
For DRPD
For details, see Setting the DRPD Ring Pattern (US and Canada only).
For Network switch
Receiving a Fax Temporarily in the Memory of the Machine (Memory Receiving)
If the machine was not able to print a received fax, the machine stores the unprinted fax temporarily in its memory (memory receiving). An unsent fax is also stored in the memory. If an error occurred when sending a fax, it is not stored.
When a fax is stored in the memory, the In Use/Memory lamp lights and the message "Received in memory" appears on the LCD.
Caution
If you disconnect the power plug, all the documents stored in memory are deleted. Send or print necessary documents, or save them on the USB flash drive before disconnecting the power plug.
If the machine receives a fax under one of the following conditions, the machine will automatically store the received fax in its memory.
Replace the empty FINE Cartridge. The fax in memory will be automatically printed.
Caution
Load the paper and press the OK button. The fax in memory will be automatically printed.
Load paper of the same size as selected for Page size, and press the OK button. The fax in memory will be automatically printed.
Select A4, 8.5"x11"(LTR), or Legal (or 8.5"x14") for Page size.
See Preparing for Receiving a Fax.
Select Plain paper for Media type.
See Preparing for Receiving a Fax.
Press the FAX button to resume printing of the fax.
Caution
* When using ITU-T No.1 chart (Standard mode)
See Printing Documents in the Memory.
Printing Documents in the Memory
You can print all documents in memory at once or select a document for printing on the Memory reference screen. You can also save the documents on the USB flash drive.
This section describes the procedure to print all the received documents in the memory.
Caution
For the conditions the faxes are stored in the memory, see Receiving a Fax Temporarily in the Memory of the Machine (Memory Receiving).
1. Load paper.
See Loading Paper .
Here we make sure that plain paper is loaded in the Rear Tray.
2. Specify the paper settings as necessary.
If a page size other than A4, 8.5"x11" (LTR), or Legal (or 8.5"x14"), or a media type other than Plain paper is selected, faxes or reports cannot be printed. Confirm or change the paper settings.
See Preparing for Receiving a Fax.
3. Display the Memory reference screen.
(1) Press the FAX button, and press the Menu button.
(2) Use the
4. Print all the received documents in the memory.
(1) Use the

Caution
(2) Use the
The machine starts printing documents in the memory one by one.

(3) To delete the printed document, use the

To keep the document in the memory, select No.
(4) Press the OK button.
Caution
The deletion confirmation screen will appear each time after one document is printed. Repeat the same procedure until all documents are printed.