

Issue
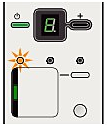
When a machine error occurs, the Alarm lamp is lit orange and E and number (error code) are alternately displayed on the LED. Check the error code displayed on the LED and take the appropriate action to correct the error.
* Depending on the error occured, the Alarm lamp is not lit.
When the Power and Alarm lamps flash alternately as shown below, and P and number (error code) are alternately displayed on the LED, an error requiring servicing might have occurred.
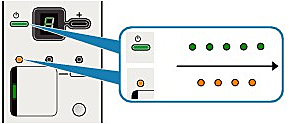
Turn off the machine, and unplug the power cord of the machine from the power supply.
Plug the power cord of the machine back in, and then turn on the machine.
If the problem is not resolved, contact your Canon service representative.
Cause and solution
E, 2
The machine is out of paper. / Paper does not feed.
Reload the paper on the Rear Tray correctly and press the Black or Color button.
Caution
Caution
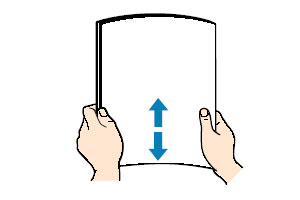
1. Flatten the four corners of paper before loading it.
Caution
2. Prepare for loading paper.
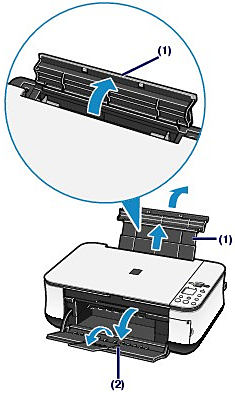
(1) Open the Paper Support, raise it, then tip it back.
(2) Open the Paper Output Tray gently, and open the Output Tray Extension.
3. Load paper.
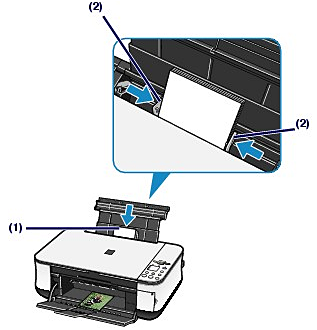
(1) Slide the Paper Guides to open them, and load the paper in the center of the Rear Tray WITH THE PRINT SIDE FACING YOU.
(2) Slide the Paper Guides to align them with both sides of the paper stack.
Do not slide the Paper Guides too hard. The paper may not be fed properly.
Caution
Caution
After loading paper
Cause and solution
E, 3
Paper jam.
If paper has jammed in the machine, clear the jam, reload the paper in the machine correctly and then press the Black or Color button.
Cause and solution
E, 4 / E, 5
The FINE Cartridge cannot be recognized.
The FINE Cartridge may not be installed properly, or the Cartridge may not be compatible with this machine.
Open the Scanning Unit (Cover) and install the appropriate FINE Cartridge.
If the error is not resolved, the FINE Cartridge may be damaged. Contact your Canon service representative.
Cause and solution
E, 7
FINE Cartridge is not installed in the correct position.
Make sure that each FINE Cartridge is installed in the correct position.
When FINE Cartridges run out of ink, follow the procedure below to replace them.
Caution
Handling FINE Cartridges
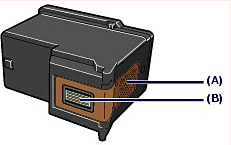
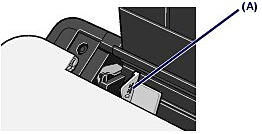
(A) Electrical contacts
(B) Print head nozzles
Caution
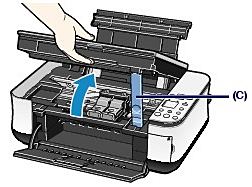
1. Make sure that the power is turned on, and open the Paper Output Tray.
2. Lift the Scanning Unit (Cover), then hold it open with the Scanning Unit Support (C). The FINE Cartridge Holder moves to the replacement position.
Caution
Caution
3. Remove the empty FINE Cartridge.
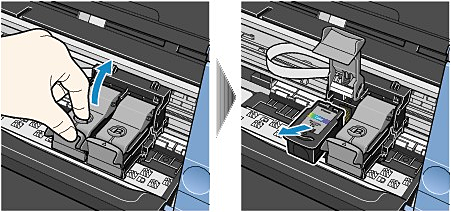
(1) Pinch the tabs and open the Ink Cartridge Locking Cover.
(2) Remove the FINE Cartridge.
Caution
4. Prepare the new FINE Cartridge.
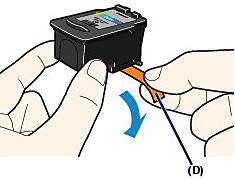
(1) Take a new FINE Cartridge out of its package and remove the orange protective tape (D) gently.
Caution
5. Install the FINE Cartridge.

(1) Put a new FINE Cartridge in the FINE Cartridge Holder.
The Color FINE Cartridge should be installed into the left slot and the Black FINE Cartridge should be into the right slot.
(2) Close the Ink Cartridge Locking Cover to lock the FINE Cartridge into place.
Push down the Ink Cartridge Locking Cover until it clicks.
(3) Confirm that the Ink Cartridge Locking Cover is closed correctly.
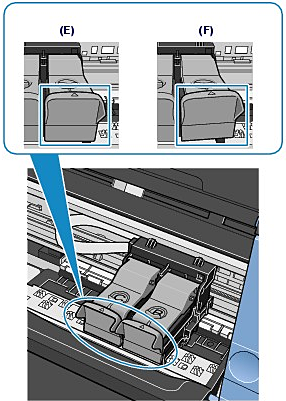
(E) Closed correctly
(F) Not closed correctly (the cover is tilted)
Caution
Caution
6. Lift the Scanning Unit (Cover) slightly to set the Scanning Unit Support back to its original position, and gently close the Scanning Unit (Cover).
If you replaced the FINE Cartridge while printing, the machine resumes printing automatically.
Caution
Caution
Cause and solution
E, 8
Ink absorber is almost full.
The ink absorber is becoming full.
The machine has a built-in ink absorber to hold the ink used during Print Head Cleaning.
Press the Black or Color button to cancel the error so you can continue printing. Before the ink absorber becomes completely full, contact a Canon service representative. (You will need to replace a particular part of the machine.)
Cause and solution
E, 9
The machine has not received a response from the digital camera. The digital camera or digital video camcorder connected is not compatible with this machine.
Cause and solution
E, 1, 3
Ink level cannot be detected.
Ink may have run out.
The function for detecting the remaining ink level will be disabled since the ink level cannot be correctly detected.
If you want to continue printing without this function, press the Stop/Reset button for at least 5 seconds.
Canon recommends to use new genuine Canon cartridges in order to obtain optimum qualities.
Please be advised that Canon shall not be liable for any malfunction or trouble caused by continuation of printing under the ink out condition.
You can check the ink status on the computer screen or with the Ink lamps on the Operation Panel.
Caution
With the Ink Lamps on the Operation Panel
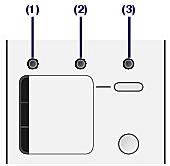
(1) Alarm lamp
(2) Color Ink lamp
(3) Black Ink lamp
Color Ink lamp or Black Ink lamp lights
Ink is low. You can continue printing for a while, but we recommend you to have a new FINE Cartridge available.
Color Ink lamp or Black Ink lamp flashes, while Alarm lamp lights
Color Ink lamp or Black Ink lamp flashes, while Alarm lamp is off
The function for detecting the remaining ink level is disabled.
With the Computer Screen
You can confirm the status of each FINE Cartridge on the printer status monitor (Windows) or Canon IJ Printer Utility (Macintosh).


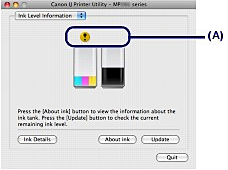
(A) Check if any symbol appears on the screen.
(Ink low) | The ink is running low. You can continue printing for a while, but we recommend you to have a new FINE Cartridge available. |
Caution
An error message may appear while printing. Confirm the message and take an appropriate action.
Follow the procedure below to open each of the confirmation screens.

1. Open the printer properties dialog box from the Control Panel.
2. Click View Printer Status on the Maintenance sheet.
To confirm the FINE Cartridge information, click the Ink Details menu.
Caution
You can also display the printer status monitor by clicking Canon XXX Printer (where "XXX" is your machine's name) which appears on the taskbar during printing.

1. Open the Canon IJ Printer Utility.
2. Select Ink Level Information in the pop-up menu. To confirm the FINE Cartridge information, click Ink Details.
Cause and solution
E, 1, 4
The FINE Cartridge cannot be recognized.
The FINE Cartridge may not be compatible with this machine.
Install the appropriate FINE Cartridge.
When FINE Cartridges run out of ink, follow the procedure below to replace them.
Caution
Handling FINE Cartridges
(A) Electrical contacts
(B) Print head nozzles
Caution
1. Make sure that the power is turned on, and open the Paper Output Tray.
2. Lift the Scanning Unit (Cover), then hold it open with the Scanning Unit Support (C). The FINE Cartridge Holder moves to the replacement position.
Caution
Caution
3. Remove the empty FINE Cartridge.
(1) Pinch the tabs and open the Ink Cartridge Locking Cover.
(2) Remove the FINE Cartridge.
Caution
4. Prepare the new FINE Cartridge.
(1) Take a new FINE Cartridge out of its package and remove the orange protective tape (D) gently.
Caution
5. Install the FINE Cartridge.
(1) Put a new FINE Cartridge in the FINE Cartridge Holder.
The Color FINE Cartridge should be installed into the left slot and the Black FINE Cartridge should be into the right slot.
(2) Close the Ink Cartridge Locking Cover to lock the FINE Cartridge into place.
Push down the Ink Cartridge Locking Cover until it clicks.
(3) Confirm that the Ink Cartridge Locking Cover is closed correctly.
(E) Closed correctly
(F) Not closed correctly (the cover is tilted)
Caution
Caution
6. Lift the Scanning Unit (Cover) slightly to set the Scanning Unit Support back to its original position, and gently close the Scanning Unit (Cover).
If you replaced the FINE Cartridge while printing, the machine resumes printing automatically.
Caution
Caution
Cause and solution
E, 1, 5
The FINE Cartridge cannot be recognized.
The FINE Cartridge may not be installed properly.
Open the Scanning Unit (Cover) and install the FINE Cartridge properly.
When FINE Cartridges run out of ink, follow the procedure below to replace them.
Caution
Handling FINE Cartridges
(A) Electrical contacts
(B) Print head nozzles
Caution
1. Make sure that the power is turned on, and open the Paper Output Tray.
2. Lift the Scanning Unit (Cover), then hold it open with the Scanning Unit Support (C). The FINE Cartridge Holder moves to the replacement position.
Caution
Caution
3. Remove the empty FINE Cartridge.
(1) Pinch the tabs and open the Ink Cartridge Locking Cover.
(2) Remove the FINE Cartridge.
Caution
4. Prepare the new FINE Cartridge.
(1) Take a new FINE Cartridge out of its package and remove the orange protective tape (D) gently.
Caution
5. Install the FINE Cartridge.
(1) Put a new FINE Cartridge in the FINE Cartridge Holder.
The Color FINE Cartridge should be installed into the left slot and the Black FINE Cartridge should be into the right slot.
(2) Close the Ink Cartridge Locking Cover to lock the FINE Cartridge into place.
Push down the Ink Cartridge Locking Cover until it clicks.
(3) Confirm that the Ink Cartridge Locking Cover is closed correctly.
(E) Closed correctly
(F) Not closed correctly (the cover is tilted)
Caution
Caution
6. Lift the Scanning Unit (Cover) slightly to set the Scanning Unit Support back to its original position, and gently close the Scanning Unit (Cover).
If you replaced the FINE Cartridge while printing, the machine resumes printing automatically.
Caution
Caution
Cause and solution
E, 1, 6
Ink has run out.
Ink has run out.
Replace the ink cartridge and close the Scanning Unit (Cover).
If printing is in progress and you want to continue printing, press the Stop/Reset button for at least 5 seconds with the ink cartridge installed. Then printing can continue under the ink out condition.
The function for detecting the remaining ink level will be disabled.
Replace the empty ink cartridge immediately after the printing. The resulting print quality is not satisfactory, if printing is continued under the ink out condition.
When FINE Cartridges run out of ink, follow the procedure below to replace them.
Caution
Handling FINE Cartridges
(A) Electrical contacts
(B) Print head nozzles
Caution
1. Make sure that the power is turned on, and open the Paper Output Tray.
2. Lift the Scanning Unit (Cover), then hold it open with the Scanning Unit Support (C). The FINE Cartridge Holder moves to the replacement position.
Caution
Caution
3. Remove the empty FINE Cartridge.
(1) Pinch the tabs and open the Ink Cartridge Locking Cover.
(2) Remove the FINE Cartridge.
Caution
4. Prepare the new FINE Cartridge.
(1) Take a new FINE Cartridge out of its package and remove the orange protective tape (D) gently.
Caution
5. Install the FINE Cartridge.
(1) Put a new FINE Cartridge in the FINE Cartridge Holder.
The Color FINE Cartridge should be installed into the left slot and the Black FINE Cartridge should be into the right slot.
(2) Close the Ink Cartridge Locking Cover to lock the FINE Cartridge into place.
Push down the Ink Cartridge Locking Cover until it clicks.
(3) Confirm that the Ink Cartridge Locking Cover is closed correctly.
(E) Closed correctly
(F) Not closed correctly (the cover is tilted)
Caution
Caution
6. Lift the Scanning Unit (Cover) slightly to set the Scanning Unit Support back to its original position, and gently close the Scanning Unit (Cover).
If you replaced the FINE Cartridge while printing, the machine resumes printing automatically.
Caution
Caution
Cause and solution
E, 1, 9
PictBridge compliant device is connected via a USB hub.
If a PictBridge compliant device is connected via a USB hub, remove the hub and connect it directly to the machine.
Cause and solution
E, 3, 0
The size of the original cannot be correctly detected or the document is too small when the Fit-to-Page copying is selected.
Cause and solution
E, 3, 1
The machine is not connected with the computer.
Connect the machine and the computer with a USB cable.
Cause and solution
E, 5, 0 / E, 5, 1
Scanning the Print Head Alignment Sheet has failed.
If the error is not resolved, connect the machine to the computer and align the Print Head on the printer driver.
If printed ruled lines are misaligned or print results are otherwise unsatisfactory, adjust the print head position.
You need to prepare: a sheet of A4 or Letter-sized plain paper
1. Make sure that the power is turned on, and load a sheet of A4 or Letter-sized plain paper in the Rear Tray.
2. Open the Paper Output Tray gently, and open the Output Tray Extension.
3. Print the print head alignment sheet.
(1) Press the 
Caution
(2) Press the Black or Color button.
The print head alignment sheet will be printed.
4. Adjust the print head position.
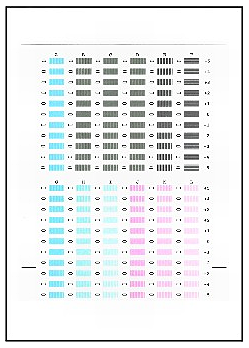
(1) Check the printed patterns, and fill in the corresponding circle with a dark pencil or a black ink pen to select the number of the pattern in column A that has the least noticeable streaks.
Caution
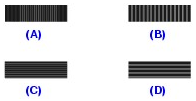
(A) Less noticeable vertical white streaks
(B) Noticeable vertical white streaks
(C) Less noticeable horizontal white streaks
(D) Noticeable horizontal white streaks
(2) Repeat the same procedure until you finish selecting the number of the pattern in column L.
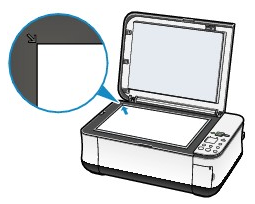
(3) Place the print head alignment sheet on the Platen Glass.
Place the print head alignment sheet with the filled-in side FACING DOWN and align the upper corner of the sheet with the alignment mark as shown below.
Then close the Document Cover gently.
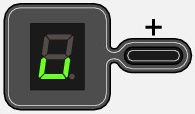
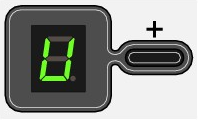
(4) Make sure that U appears on the LED, and press the Black or Color button.
The print head alignment sheet is scanned and the print head position is adjusted automatically.
Caution
Caution