

Issue
Caution
If you need to turn off the printer to remove jammed paper during printing, cancel print jobs before turning off the printer.
Cause and solution
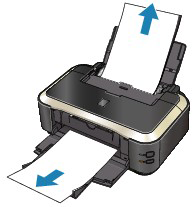
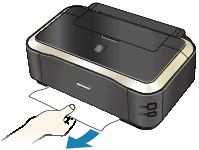
Paper Is Jammed in the Paper Output Slot or the Rear Tray
Remove the paper following the procedure below.
1. Slowly pull the paper out, either from the Rear Tray or from the Paper Output Slot, whichever is easier.
Caution
Be careful not to touch the components inside the printer.
After removing all paper, close the Top Cover, turn the printer off, and turn it back on.
Cause and solution
2. Reload the paper, and press the RESUME/CANCEL button on the printer.
If you turned off the printer in step 1, all print jobs in the queue are canceled. Reprint if necessary.
Caution
Cause and solution
If you cannot remove the paper or the paper tears inside the printer, or if the paper jam error continues after removing the paper, contact the service center.
Cause and solution
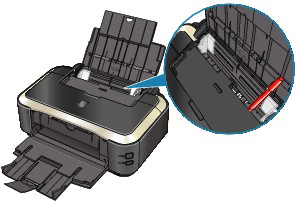
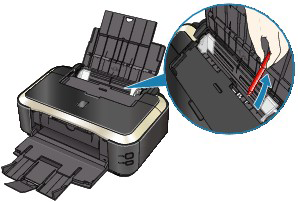
Paper Is Jammed inside the Printer at the Transport Unit
Remove the paper following the procedure below.
1. Detach the Rear Cover.
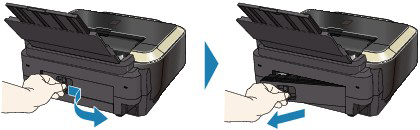
2. Pull the paper out slowly.
Caution
Cause and solution
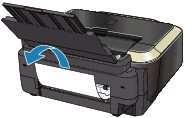
3. Attach the Rear Cover.
Push the left side of the Rear Cover until it is closed completely.
Cause and solution
If you were not able to remove the paper out in step 2:
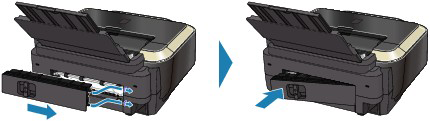
4. Remove the Cassette.
5. Pull the paper out slowly.
6. If any paper is sticking out of the Cassette, remove the paper, align and reload the paper in the Cassette.
If you did not remove the jammed paper out in step 1 to 5 when automatic duplex printing, check the duplex transport section.
-⋗ Jammed Paper Is Not Removed out When Automatic Duplex Printing
Caution
When reloading the paper into the printer, confirm that you are using the correct paper and are loading it into the printer correctly.
Cause and solution
7. Insert the Cassette into the printer again, and press the RESUME/CANCEL button on the printer.
If you turned off the printer in step 2, all print jobs in queue are canceled. Reprint if necessary.
If you cannot remove the paper or the paper tears inside the printer, or if the paper jam error continues after removing the paper, contact the service center.
Cause and solution
Jammed Paper Is Not Removed out When Automatic Duplex Printing
Before removing the jammed paper, see Paper Is Jammed inside the Printer at the Transport Unit to remove it from Transport Unit. If the paper jam error continues, remove the jammed paper following the procedure below.
1. Turn off the printer, and unplug the power cord of the printer from the power supply.
2. Remove the Cassette.
If the paper is loaded on the Rear Tray, remove the paper from the Rear Tray and retract the Paper Support.
3. Set the printer upright with the left side down.
4. Slowly pull the jammed paper out so that the paper does not tear.

Caution
Set the printer back to its original position immediately after removing the jammed paper.
Cause and solution
5. Align the paper, then reload it in the Cassette.
Reload paper in the Rear Tray, if necessary.
Caution
When reloading the paper into the printer, confirm that you are using the correct paper and are loading it into the printer correctly.
Cause and solution
6. Insert the Cassette into the printer again.
7. Plug the printer back in and turn the printer back on.
All print jobs in queue are canceled. Reprint if necessary.
If you cannot remove the paper or the paper tears inside the printer, or if the paper jam error continues after removing the paper, contact the service center.
Cause and solution
In Other Cases
Make sure of the following:
If there are any foreign objects in the Rear Tray, be sure to turn off the printer, unplug it from the power supply, then remove the foreign object.
-⋗Check 3: Load the paper after correcting its curl .