


Issue
Before connecting this printer to the network, confirm the following two items, (A) and (B).
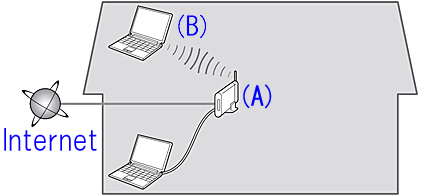
(A) Access point or router (supporting IEEE802.11b/g/n)
An access point or router is a relay device which connects not only the Internet and network devices such as a computer or printer, but also one network device to another.
So, your access point or router must be properly set before you go to the next setup step.
(B) The computer to be used with the printer must be connected to the network.
In order to confirm whether the computer to be used with the printer is connected to the network, try to browse the Internet website from the computer.
Caution
- If you do not know how to set up the router / access point or the Internet, please refer to:
Cause and solution
To use the printer in wireless connection, select the setup method first.
Cause and solution
Standard setup connection
In most cases, you can use the printer in wireless connection using this setup method.
Wireless Setup Using Standard Setup
Before Starting Wireless Connection Setup
Caution
Make sure that the printer is turned on.
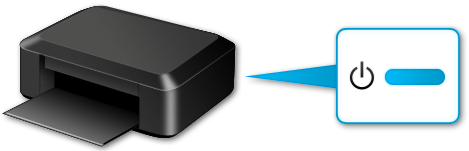
1. Press the HOME button (A) on the printer.

2. Use the 


Press the OK button.
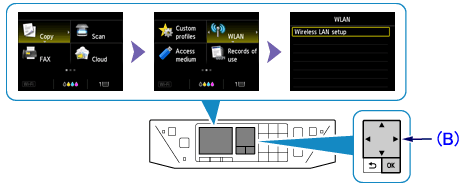
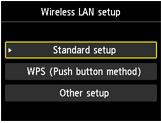
3. Slect [Wireless LAN setup], then press the OK button.
4.
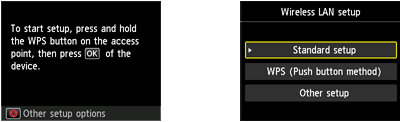
When the screen left above is displayed, go to the step 5.
When the screen right above is displayed, go to the step 6.
5. Press the [ Stop ] button.

6. Select [ Standard setup ].
Press the [ OK ] button.
7. Select your access point, then press the [ OK ] button.
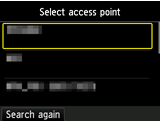
Caution
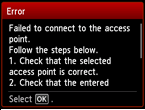
If a different screen appears, see "If an Error Screen Appears" below in this page and follow the instructions there.
8. Either of the following screens should be displayed:
If Connected to the access point. appears on the printer, the network does not require a password.
9. Press the [ OK ] button.
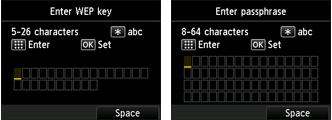
10. Enter the network password (WEP key or passphrase).
Character entry is case-sensitive so be sure to confirm.
Caution
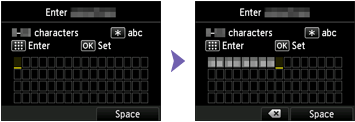
- Character Entry
On this printer, you can enter characters using the Numeric buttons (A). Follow the procedure below.
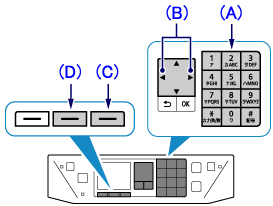
(1) Use the Numeric buttons to enter characters.
Character entry is case-sensitive.
Press the 
(2) Enter characters using the Numeric buttons.
Multiple characters are assigned to each key. Press a key to toggle character options for that key. For details on assigned characters, refer to "Key Assignments" below.
(3) Repeat (1) and (2) to enter more characters.
⋖Key Assignments⋗
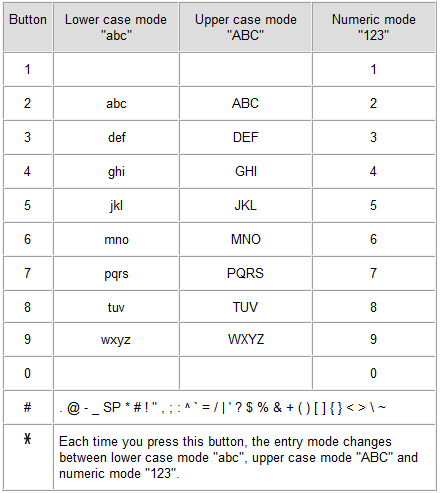
SP: Indicates a single space.
- To enter characters assigned to the same key successively (e.g., enter "N" then "O"), press the
- To insert a space, move the cursor to the target position using the 
- To insert characters, move the cursor to the character on the right of the target position using the
- To delete a character, move the cursor to the target character using the
11. Press the OK button.
12. Make sure that the network password is correct.
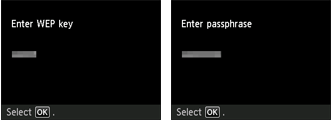
Character entry is case-sensitive.
13. Press the OK button.
Caution
If a different screen appears, see "If an Error Screen Appears" below in this page and follow the instructions there.
14. When the left screen appears, press the OK button.

Caution
If a different screen appears, see "If an Error Screen Appears" below in this page and follow the instructions there.
The wireless LAN setup in the standard method is completed.
Install the software.
If an Error Screen Appears
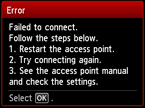
Is the network device (router, etc.) turned on? If the network device is already turned on, turn it off, then turn it back on.
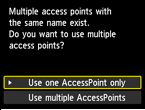
The message appears when multiple access points with the same name are found.
- When you have only one access point
Select Use one AccessPoint only, then press the OK button.
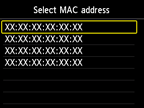
"Select the MAC address of the target access point on the displayed screen, then press the OK button.
For details on how to check the MAC address of the access point, refer to the manual supplied with the access point or contact its manufacturer."
- When using multiple access points.
Select Use multiple AccessPoints, then press the OK button.
Access points in use nearby may also be detected.
Access point names with double-byte characters are not displayed properly. However, they can be selected.
Refer to the access point manual or contact its manufacturer.
Refer to the access point manual or contact its manufacturer.

Make sure that the passphrase entered for the access point is correct.
Make sure that the WEP key entered for the access point is correct. In addition, when using WEP key number 2, 3 or 4 of the access point, set to use WEP key number 1, or select a WEP key number by entering wireless connection settings of the printer directly.
Cause and solution
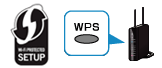
WPS connection
When the access point or the router you are using supports the WPS function, you can use this setup method to connect the printer in a wireless connection.
Confirm that the access point or the router you are using has the WPS button.
Caution
 on the access point or the router you are using if it supports the WPS function.
Wireless Setup Using WPS (Wi-Fi Protected Setup)
Before Starting Wireless Connection Setup
Caution
Make sure that the printer is turned on.
1. Press the HOME button (A) on the printer.
2. Use the
Press the OK button.
3. Slect [Wireless LAN setup], then press the OK button.
4.
When the screen left above is displayed, go to the step 5.
When the screen right above is displayed, go to the step 6.
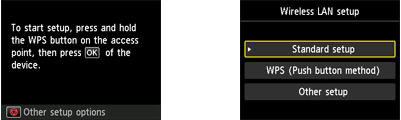
5. Press and hold the WPS button on the access point.
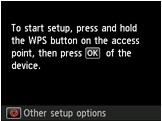
-⋗ Go to 9.
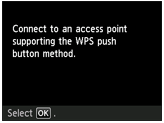
6. Select [WPS (Push button method)].
Press the OK button.

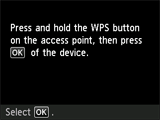
7. Press the OK button.
8. Press and hold the WPS button on the access point.
Caution
For details on pressing the WPS button, refer to the access point manual.
9. Press the OK button on the printer within 2 minutes.
Caution
If a different screen appears, see "If an Error Screen Appears" below in this page and follow the instructions there.
10. When the left screen appears, press the OK button.
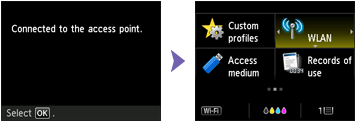
The wireless LAN setup using WPS is completed.
Install the software.
If an Error Screen Appears

The screen appears when connections are being attempted from multiple access points simultaneously. Wait for a while, then configure WPS settings again. Press the WPS button on only one access point.
The screen appears when an error occurs.
Check the access point settings, then configure WPS settings again.
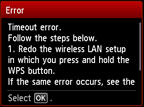
The screen appears when WPS setup was not completed within a specified time.
Is the network device (router, etc.) turned on? If the network device is already turned on, turn it off, then turn it back on.
Set up a wireless connection manually.
-⋗[ Wireless LAN connection of your printer to an access point in the standard setup method ]